伍中联(Vanda)的博客

当一切理所当然就没有你什么事了 当你说:“这个好麻烦,那么不要犹豫,主动出击”

0%

什么是Keep-Alive模式?

我们知道HTTP协议采用“请求-应答”模式,当使用普通模式,即非KeepAlive模式时,每个请求/应答客户和服务器都要新建一个连接,完成 之后立即断开连接(HTTP协议为无连接的协议);当使用Keep-Alive模式(又称持久连接、连接重用)时,Keep-Alive功能使客户端到服 务器端的连接持续有效,当出现对服务器的后继请求时,Keep-Alive功能避免了建立或者重新建立连接。

http 1.0中默认是关闭的,需要在http头加入”Connection: Keep-Alive”,才能启用Keep-Alive;http 1.1中默认启用Keep-Alive,如果加入”Connection: close “,才关闭。目前大部分浏览器都是用http1.1协议,也就是说默认都会发起Keep-Alive的连接请求了,所以是否能完成一个完整的Keep- Alive连接就看服务器设置情况。

启用Keep-Alive的优点

从上面的分析来看,启用Keep-Alive模式肯定更高效,性能更高。因为避免了建立/释放连接的开销。下面是RFC 2616 上的总结:

  1. By opening and closing fewer TCP connections, CPU time is saved in routers and hosts (clients, servers, proxies, gateways, tunnels, or caches), and memory used for TCP protocol control blocks can be saved in hosts.

  2. HTTP requests and responses can be pipelined on a connection. Pipelining allows a client to make multiple requests without waiting for each response, allowing a single TCP connection to be used much more efficiently, with much lower elapsed time.

  3. Network congestion is reduced by reducing the number of packets caused by TCP opens, and by allowing TCP sufficient time to determine the congestion state of the network.

  4. Latency on subsequent requests is reduced since there is no time spent in TCP’s connection opening handshake.

  5. HTTP can evolve more gracefully, since errors can be reported without the penalty of closing the TCP connection. Clients using future versions of HTTP might optimistically try a new feature, but if communicating with an older server, retry with old semantics after an error is reported.

RFC 2616 (P47)还指出:单用户客户端与任何服务器或代理之间的连接数不应该超过2个。一个代理与其它服务器或代码之间应该使用不超过2 * N的活跃并发连接。这是为了提高HTTP响应时间,避免拥塞(冗余的连接并不能代码执行性能的提升)

回到我们的问题(即如何判断消息内容/长度的大小?)

Keep-Alive模式,客户端如何判断请求所得到的响应数据已经接收完成(或者说如何知道服务器已经发生完了数据)?我们已经知道 了,Keep-Alive模式发送玩数据HTTP服务器不会自动断开连接,所有不能再使用返回EOF(-1)来判断(当然你一定要这样使用也没有办法,可 以想象那效率是何等的低)!下面我介绍两种来判断方法。

使用消息首部字段Conent-Length

故名思意,Conent-Length表示实体内容长度,客户端(服务器)可以根据这个值来判断数据是否接收完成。但是如果消息中没有Conent-Length,那该如何来判断呢?又在什么情况下会没有Conent-Length呢?请继续往下看……

使用消息首部字段Transfer-Encoding

当客户端向服务器请求一个静态页面或者一张图片时,服务器可以很清楚的知道内容大小,然后通过Content-length消息首部字段告诉客户端 需要接收多少数据。但是如果是动态页面等时,服务器是不可能预先知道内容大小,这时就可以使用Transfer-Encoding:chunk模式来传输 数据了。即如果要一边产生数据,一边发给客户端,服务器就需要使用”Transfer-Encoding: chunked”这样的方式来代替Content-Length。

chunk编码将数据分成一块一块的发生。Chunked编码将使用若干个Chunk串连而成,由一个标明长度为0 的chunk标示结束。每个Chunk分为头部和正文两部分,头部内容指定正文的字符总数(十六进制的数字 )和数量单位(一般不写),正文部分就是指定长度的实际内容,两部分之间用回车换行(CRLF) 隔开。在最后一个长度为0的Chunk中的内容是称为footer的内容,是一些附加的Header信息(通常可以直接忽略)。 Chunk编码的格式如下:

1
2
3
4
5
6
7
8
9
10
11
12
13
14
15
16
17
18
Chunked-Body = *<strong>chunk </strong>
"0" CRLF
footer
CRLF
chunk = chunk-size [ chunk-ext ] CRLF
chunk-data CRLF

hex-no-zero = &lt;HEX excluding "0"&gt;

chunk-size = hex-no-zero *HEX
chunk-ext = *( ";" chunk-ext-name [ "=" chunk-ext-value ] )
chunk-ext-name = token
chunk-ext-val = token | quoted-string
chunk-data = chunk-size(OCTET)

footer = *entity-header

即Chunk编码由四部分组成: 1<strong>0至多个chunk块</strong>2<strong>"0" CRLF </strong>3<strong>footer </strong>4<strong>CRLF</strong> <strong>.</strong> 而每个chunk块由:chunk-size、chunk-ext(可选)、CRLF、chunk-data、CRLF组成。

消息长度的总结

其实,上面2中方法都可以归纳为是如何判断http消息的大小、消息的数量。RFC 2616 对 消息的长度总结如下:一个消息的transfer-length(传输长度)是指消息中的message-body(消息体)的长度。当应用了 transfer-coding(传输编码),每个消息中的message-body(消息体)的长度(transfer-length)由以下几种情况 决定(优先级由高到低):

  1. 任何不含有消息体的消息(如1XXX、204、304等响应消息和任何头(HEAD,首部)请求的响应消息),总是由一个空行(CLRF)结束。

  2. 如果出现了Transfer-Encoding头字段 并且值为非“identity”,那么transfer-length由“chunked” 传输编码定义,除非消息由于关闭连接而终止。

  3. 如果出现了Content-Length头字段,它的值表示entity-length(实体长度)和transfer-length(传输长 度)。如果这两个长度的大小不一样(i.e.设置了Transfer-Encoding头字段),那么将不能发送Content-Length头字段。并 且如果同时收到了Transfer-Encoding字段和Content-Length头字段,那么必须忽略Content-Length字段。

  4. 如果消息使用媒体类型“multipart/byteranges”,并且transfer-length 没有另外指定,那么这种自定界(self-delimiting)媒体类型定义transfer-length 。除非发送者知道接收者能够解析该类型,否则不能使用该类型。

  5. 由服务器关闭连接确定消息长度。(注意:关闭连接不能用于确定请求消息的结束,因为服务器不能再发响应消息给客户端了。)

为了兼容HTTP/1.0应用程序,HTTP/1.1的请求消息体中必须包含一个合法的Content-Length头字段,除非知道服务器兼容 HTTP/1.1。一个请求包含消息体,并且Content-Length字段没有给定,如果不能判断消息的长度,服务器应该用用400 (bad request) 来响应;或者服务器坚持希望收到一个合法的Content-Length字段,用 411 (length required)来响应。

所有HTTP/1.1的接收者应用程序必须接受“chunked” transfer-coding (传输编码),因此当不能事先知道消息的长度,允许使用这种机制来传输消息。消息不应该够同时包含 Content-Length头字段和non-identity transfer-coding。如果一个消息同时包含non-identity transfer-coding和Content-Length ,必须忽略Content-Length 。

HTTP头字段总结

最后我总结下HTTP协议的头部字段。

  1. Accept:告诉WEB服务器自己接受什么介质类型,/ 表示任何类型,type/* 表示该类型下的所有子类型,type/sub-type。

  2. Accept-Charset: 浏览器申明自己接收的字符集 Accept-Encoding: 浏览器申明自己接收的编码方法,通常指定压缩方法,是否支持压缩,支持什么压缩方法(gzip,deflate) Accept-Language:浏览器申明自己接收的语言 语言跟字符集的区别:中文是语言,中文有多种字符集,比如big5,gb2312,gbk等等。

  3. Accept-Ranges:WEB服务器表明自己是否接受获取其某个实体的一部分(比如文件的一部分)的请求。bytes:表示接受,none:表示不接受。

  4. Age:当代理服务器用自己缓存的实体去响应请求时,用该头部表明该实体从产生到现在经过多长时间了。

  5. Authorization:当客户端接收到来自WEB服务器的 WWW-Authenticate 响应时,用该头部来回应自己的身份验证信息给WEB服务器。

  6. Cache-Control:请求:no-cache(不要缓存的实体,要求现在从WEB服务器去取) max-age:(只接受 Age 值小于 max-age 值,并且没有过期的对象) max-stale:(可以接受过去的对象,但是过期时间必须小于 max-stale 值) min-fresh:(接受其新鲜生命期大于其当前 Age 跟 min-fresh 值之和的缓存对象) 响应:public(可以用 Cached 内容回应任何用户) private(只能用缓存内容回应先前请求该内容的那个用户) no-cache(可以缓存,但是只有在跟WEB服务器验证了其有效后,才能返回给客户端) max-age:(本响应包含的对象的过期时间) ALL: no-store(不允许缓存)

  7. Connection:请求:close(告诉WEB服务器或者代理服务器,在完成本次请求的响应后,断开连接,不要等待本次连接的后续请求了)。 keepalive(告诉WEB服务器或者代理服务器,在完成本次请求的响应后,保持连接,等待本次连接的后续请求)。 响应:close(连接已经关闭)。 keepalive(连接保持着,在等待本次连接的后续请求)。 Keep-Alive:如果浏览器请求保持连接,则该头部表明希望 WEB 服务器保持连接多长时间(秒)。例如:Keep-Alive:300

  8. Content-Encoding:WEB服务器表明自己使用了什么压缩方法(gzip,deflate)压缩响应中的对象。例如:Content-Encoding:gzip

  9. Content-Language:WEB 服务器告诉浏览器自己响应的对象的语言。

  10. Content-Length: WEB 服务器告诉浏览器自己响应的对象的长度。例如:Content-Length: 26012

  11. Content-Range: WEB 服务器表明该响应包含的部分对象为整个对象的哪个部分。例如:Content-Range: bytes 21010-47021/47022

  12. Content-Type: WEB 服务器告诉浏览器自己响应的对象的类型。例如:Content-Type:application/xml

  13. ETag:就是一个对象(比如URL)的标志值,就一个对象而言,比如一个 html 文件,如果被修改了,其 Etag 也会别修改,所以ETag 的作用跟 Last-Modified 的作用差不多,主要供 WEB 服务器判断一个对象是否改变了。比如前一次请求某个 html 文件时,获得了其 ETag,当这次又请求这个文件时,浏览器就会把先前获得的 ETag 值发送给WEB 服务器,然后 WEB 服务器会把这个 ETag 跟该文件的当前 ETag 进行对比,然后就知道这个文件有没有改变了。

  14. Expired:WEB服务器表明该实体将在什么时候过期,对于过期了的对象,只有在跟WEB服务器验证了其有效性后,才能用来响应客户请求。是 HTTP/1.0 的头部。例如:Expires:Sat, 23 May 2009 10:02:12 GMT

  15. Host:客户端指定自己想访问的WEB服务器的域名/IP 地址和端口号。例如:Host:rss.sina.com.cn

  16. If-Match:如果对象的 ETag 没有改变,其实也就意味著对象没有改变,才执行请求的动作。

  17. If-None-Match:如果对象的 ETag 改变了,其实也就意味著对象也改变了,才执行请求的动作。

  18. If-Modified-Since:如果请求的对象在该头部指定的时间之后修改了,才执行请求的动作(比如返回对象),否则返回代码304,告诉浏览器 该对象没有修改。例如:If-Modified-Since:Thu, 10 Apr 2008 09:14:42 GMT

  19. If-Unmodified-Since:如果请求的对象在该头部指定的时间之后没修改过,才执行请求的动作(比如返回对象)。

  20. If-Range:浏览器告诉 WEB 服务器,如果我请求的对象没有改变,就把我缺少的部分给我,如果对象改变了,就把整个对象给我。浏览器通过发送请求对象的 ETag 或者 自己所知道的最后修改时间给 WEB 服务器,让其判断对象是否改变了。总是跟 Range 头部一起使用。

  21. Last-Modified:WEB 服务器认为对象的最后修改时间,比如文件的最后修改时间,动态页面的最后产生时间等等。例如:Last-Modified:Tue, 06 May 2008 02:42:43 GMT

  22. Location:WEB 服务器告诉浏览器,试图访问的对象已经被移到别的位置了,到该头部指定的位置去取。例如:Location:http://i0.sinaimg.cn/dy/deco/2008/0528/sinahome_0803_ws_005_text_0.gif

  23. Pramga:主要使用 Pramga: no-cache,相当于 Cache-Control: no-cache。例如:Pragma:no-cache

  24. Proxy-Authenticate: 代理服务器响应浏览器,要求其提供代理身份验证信息。Proxy-Authorization:浏览器响应代理服务器的身份验证请求,提供自己的身份信息。

  25. Range:浏览器(比如 Flashget 多线程下载时)告诉 WEB 服务器自己想取对象的哪部分。例如:Range: bytes=1173546-

  26. Referer:浏览器向 WEB 服务器表明自己是从哪个 网页/URL 获得/点击 当前请求中的网址/URL。例如:Referer:http://www.sina.com/

  27. Server: WEB 服务器表明自己是什么软件及版本等信息。例如:Server:Apache/2.0.61 (Unix)

  28. User-Agent: 浏览器表明自己的身份(是哪种浏览器)。例如:User-Agent:Mozilla/5.0 (Windows; U; Windows NT 5.1; zh-CN; rv:1.8.1.14) Gecko/20080404 Firefox/2、0、0、14

  29. Transfer-Encoding: WEB 服务器表明自己对本响应消息体(不是消息体里面的对象)作了怎样的编码,比如是否分块(chunked)。例如:Transfer-Encoding: chunked

  30. Vary: WEB服务器用该头部的内容告诉 Cache 服务器,在什么条件下才能用本响应所返回的对象响应后续的请求。假如源WEB服务器在接到第一个请求消息时,其响应消息的头部为:Content- Encoding: gzip; Vary: Content-Encoding那么 Cache 服务器会分析后续请求消息的头部,检查其 Accept-Encoding,是否跟先前响应的 Vary 头部值一致,即是否使用相同的内容编码方法,这样就可以防止 Cache 服务器用自己 Cache 里面压缩后的实体响应给不具备解压能力的浏览器。例如:Vary:Accept-Encoding

  31. Via: 列出从客户端到 OCS 或者相反方向的响应经过了哪些代理服务器,他们用什么协议(和版本)发送的请求。当客户端请求到达第一个代理服务器时,该服务器会在自己发出的请求里面添 加 Via 头部,并填上自己的相关信息,当下一个代理服务器收到第一个代理服务器的请求时,会在自己发出的请求里面复制前一个代理服务器的请求的Via 头部,并把自己的相关信息加到后面,以此类推,当 OCS 收到最后一个代理服务器的请求时,检查 Via 头部,就知道该请求所经过的路由。例如:Via:1.0 236.D0707195.sina.com.cn:80 (squid/2.6.STABLE13)
背景

我们通过提供一个对外部的Service拉起相关的进程和服务,这样能够确保我们有一个进程能够一直在后台,从而进行相关的后台操作。那么通过Service去启动所在进程都做了哪些事情,我们做个深入的分析和探讨。

使用场景

一般来说,我们在Activity中开启一个服务的代码如下

1
2
3
4
5
6
7
8
9
10
11
12
try {

Intent intent = new Intent();
if (Build.VERSION.SDK_INT >= 12)
intent.addFlags(0x00000020); // Intent.FLAG_INCLUDE_STOPPED_PACKAGES
intent.setAction("com.vanda.intent.action.FRIEND");
intent.setClassName("com.vanda", "com.vanda.bridge");
intent.putExtra("source", getPackageName());
startService(intent);
} catch (Throwable tr) {
// No such service or security error or oom error.
}

以上代码是一个APP调起另一个APP中的Service进程,这属于跨进程之间的通信范畴,接下来,我们来分析startService是如何工作的。

Android进程间通信

Android系统是基于Linux内核的,而Linux内核继承和兼容了丰富的Unix系统进程间通信(IPC(Inter process communication))机制。有传统的管道(Pipe)、信号(Signal)和跟踪(Trace),这三项通信手段只能用于父进程与子进程之间,或者兄弟进程之间;后来又增加了命令管道(Named Pipe),使得进程间通信不再局限于父子进程或者兄弟进程之间;为了更好地支持商业应用中的事务处理,在AT&T的Unix系统V中,又增加了三种称为“System V IPC”的进程间通信机制,分别是报文队列(Message)、共享内存(Share Memory)和信号量(Semaphore);后来BSD Unix对“System V IPC”机制进行了重要的扩充,提供了一种称为插口(Socket)的进程间通信机制。

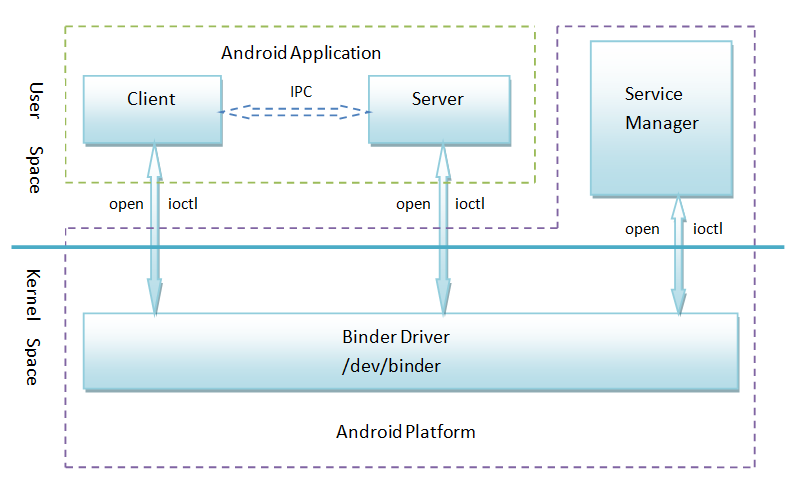
Android系统没有采用上述提到的各种进程间通信机制,而是采用Binder机制。在Android系统的Binder机制中,由一些系统组件组成,分别是Client、Server、Service Manager和Binder驱动程序,其中Client、Server和Service Manager运行在用户空间,Binder驱动程序运行内核空间。Binder就是一种把这四个组件粘合在一起的粘结剂了,其中,核心组件便是Binder驱动程序了,Service Manager提供了辅助管理的功能,Client和Server正是在Binder驱动和Service Manager提供的基础设施上,进行Client-Server之间的通信。Service Manager和Binder驱动已经在Android平台中实现好,开发者只要按照规范实现自己的Client和Server组件就可以了。

  1. Client、Server和Service Manager实现在用户空间中,Binder驱动程序实现在内核空间中

  2. Binder驱动程序和Service Manager在Android平台中已经实现,开发者只需要在用户空间实现自己的Client和Server

  3. Binder驱动程序提供设备文件/dev/binder与用户空间交互,Client、Server和Service Manager通过open和ioctl文件操作函数与Binder驱动程序进行通信

  4. Client和Server之间的进程间通信通过Binder驱动程序间接实现

  5. Service Manager是一个守护进程,用来管理Server,并向Client提供查询Server接口的能力
    (感谢老罗说的那么多)

Java层的ServiceManager

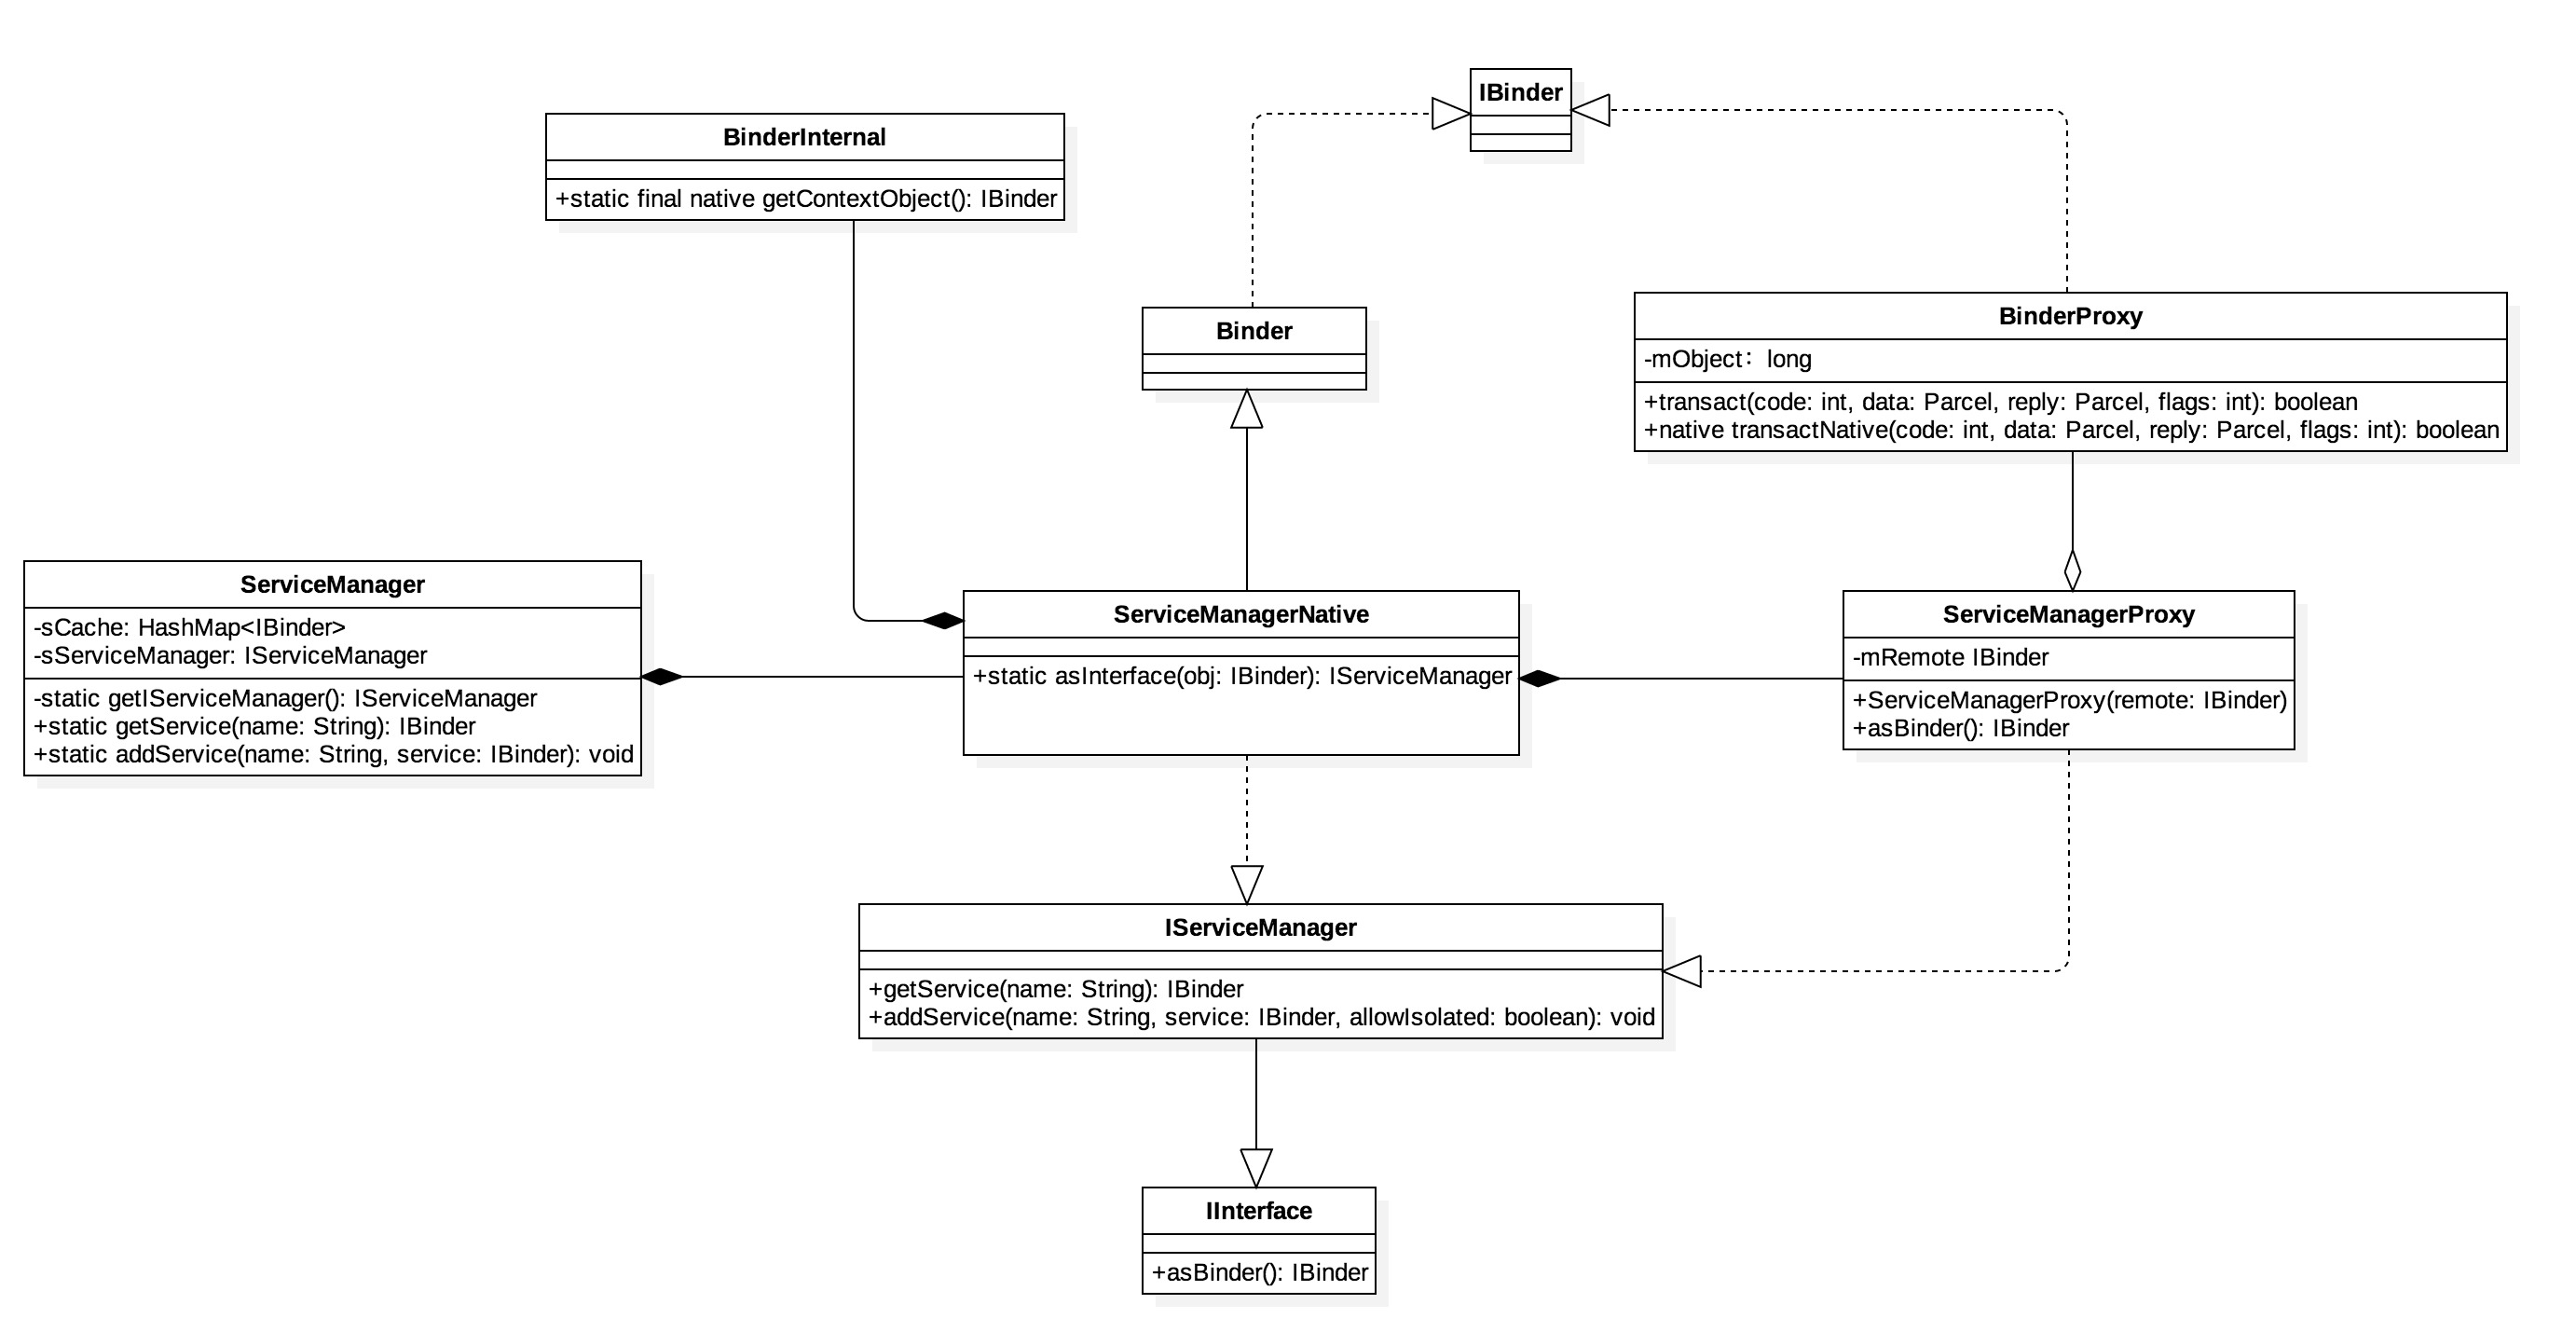
Service Manager(我觉得是C/C++层)是一个守护进程,用来管理Server,并向Client提供查询Server接口的能力,我们看下类图构成:

  1. ServiceManager提供了外部查询的和添加Service的方法,最为核心的是具备实现IServiceManager的ServiceManagerNative类。

  2. ServiceManagerNative需要一个实现IBinder的对象,这个对象通过BinderInternal.getContextObject()获得一个C层的BinderProxy对象,这是系统中全局的”context object”。

  3. ServiceManagerNative通过一个代理类ServiceManagerProxy,ServiceManagerProxy类实现了IServiceManager接口,IServiceManager提供了getService和addService两个成员函数来管理系统中的Service。从ServiceManagerProxy类的构造函数可以看出,它需要一个BinderProxy对象的IBinder接口来作为参数。因此,要获取Service Manager的Java远程接口ServiceManagerProxy,首先要有一个BinderProxy对象。再来看一下是通过什么路径来获取Service Manager的Java远程接口ServiceManagerProxy的。这个主角就是ServiceManager了,ServiceManager类有一个静态成员函getIServiceManager,它的作用就是用来获取Service Manager的Java远程接口了,而这个函数又是通过ServiceManagerNative来获取Service Manager的Java远程接口的。

1
2
3
4
5
6
7
8
9
private static IServiceManager getIServiceManager() {
if (sServiceManager != null) {
return sServiceManager;
}

// Find the service manager
sServiceManager = ServiceManagerNative.asInterface(BinderInternal.getContextObject());
return sServiceManager;
}

在C/C++层将对象进行了转换,结果是sServiceManager = ServiceManagerNative.asInterface(new BinderProxy()); 那么我们看下ServiceManagerNative.asInterface做了什么事情

1
2
3
4
5
6
7
8
9
10
11
12
13
static public IServiceManager asInterface(IBinder obj)
{
if (obj == null) {
return null;
}
IServiceManager in =
(IServiceManager)obj.queryLocalInterface(descriptor);
if (in != null) {
return in;
}

return new ServiceManagerProxy(obj);
}

从上面的静态方法中看出,如果当地查询不到IServiceManager,in为null ,obj是一个BinderProxy对象,那么就会以BinderProxy对象为参数创建一个ServiceManagerProxy对象。实质上等价的代码为
sServiceManager = new ServiceManagerProxy(new BinderProxy());
ServiceManager就是这为了这句代码写的,就是在Java层,我们拥有了一个Service Manager远程接口ServiceManagerProxy,而这个ServiceManagerProxy对象在JNI层有一个句柄值为0的BpBinder对象与之通过gBinderProxyOffsets关联起来。这样获取Service Manager的Java远程接口ServiceManagerProxy的过程就完成了。

我们简单的看下C层做了些什么

1
2
3
4
sp<IBinder> ProcessState::getContextObject(const sp<IBinder>& caller)
{
return getStrongProxyForHandle(0);
}
1
2
3
4
5
6
7
8
9
10
11
12
13
14
15
16
17
18
19
20
21
22
23
24
25
26
27
28
29
30
31
32
33
34
35
36
37
38
39
40
41
42
43
44
45
46
47
48
49
50
51
52
53
54
55
56
57
58
static jobject android_os_BinderInternal_getContextObject(JNIEnv* env, jobject clazz)

{

sp<IBinder> b = ProcessState::self()->getContextObject(NULL);

return javaObjectForIBinder(env, b);

}

jobject javaObjectForIBinder(JNIEnv* env, const sp<IBinder>& val)

{
if (val == NULL) return NULL;
if (val->checkSubclass(&gBinderOffsets)) {
// One of our own!
jobject object = static_cast<JavaBBinder*>(val.get())->object();
LOGDEATH("objectForBinder %p: it's our own %p!\n", val.get(), object);
return object;
}
// For the rest of the function we will hold this lock, to serialize
// looking/creation of Java proxies for native Binder proxies.
AutoMutex _l(mProxyLock);
// Someone else's... do we know about it?
jobject object = (jobject)val->findObject(&gBinderProxyOffsets);
if (object != NULL) {
jobject res = jniGetReferent(env, object);
if (res != NULL) {
ALOGV("objectForBinder %p: found existing %p!\n", val.get(), res);
return res;
}
LOGDEATH("Proxy object %p of IBinder %p no longer in working set!!!", object, val.get());
android_atomic_dec(&gNumProxyRefs);
val->detachObject(&gBinderProxyOffsets);
env->DeleteGlobalRef(object);
}
object = env->NewObject(gBinderProxyOffsets.mClass, gBinderProxyOffsets.mConstructor);
if (object != NULL) {
LOGDEATH("objectForBinder %p: created new proxy %p !\n", val.get(), object);
// The proxy holds a reference to the native object.
env->SetIntField(object, gBinderProxyOffsets.mObject, (int)val.get());
val->incStrong((void*)javaObjectForIBinder);
// The native object needs to hold a weak reference back to the
// proxy, so we can retrieve the same proxy if it is still active.
jobject refObject = env->NewGlobalRef(
env->GetObjectField(object, gBinderProxyOffsets.mSelf));
val->attachObject(&gBinderProxyOffsets, refObject,
jnienv_to_javavm(env), proxy_cleanup);
// Also remember the death recipients registered on this proxy
sp<DeathRecipientList> drl = new DeathRecipientList;
drl->incStrong((void*)javaObjectForIBinder);
env->SetIntField(object, gBinderProxyOffsets.mOrgue, reinterpret_cast<jint>(drl.get()));
// Note that a new object reference has been created.
android_atomic_inc(&gNumProxyRefs);
incRefsCreated(env);
}
return object;
}

返回一个句柄值为0的BpBinder对象
sp b = new BpBinder(0);
然后将这个BpBinder对象转换成一个BinderProxy,这样Java层代理类就获得这个对象。
说了这么一大坨就是为了方便我们之后获取Binder填好坑。

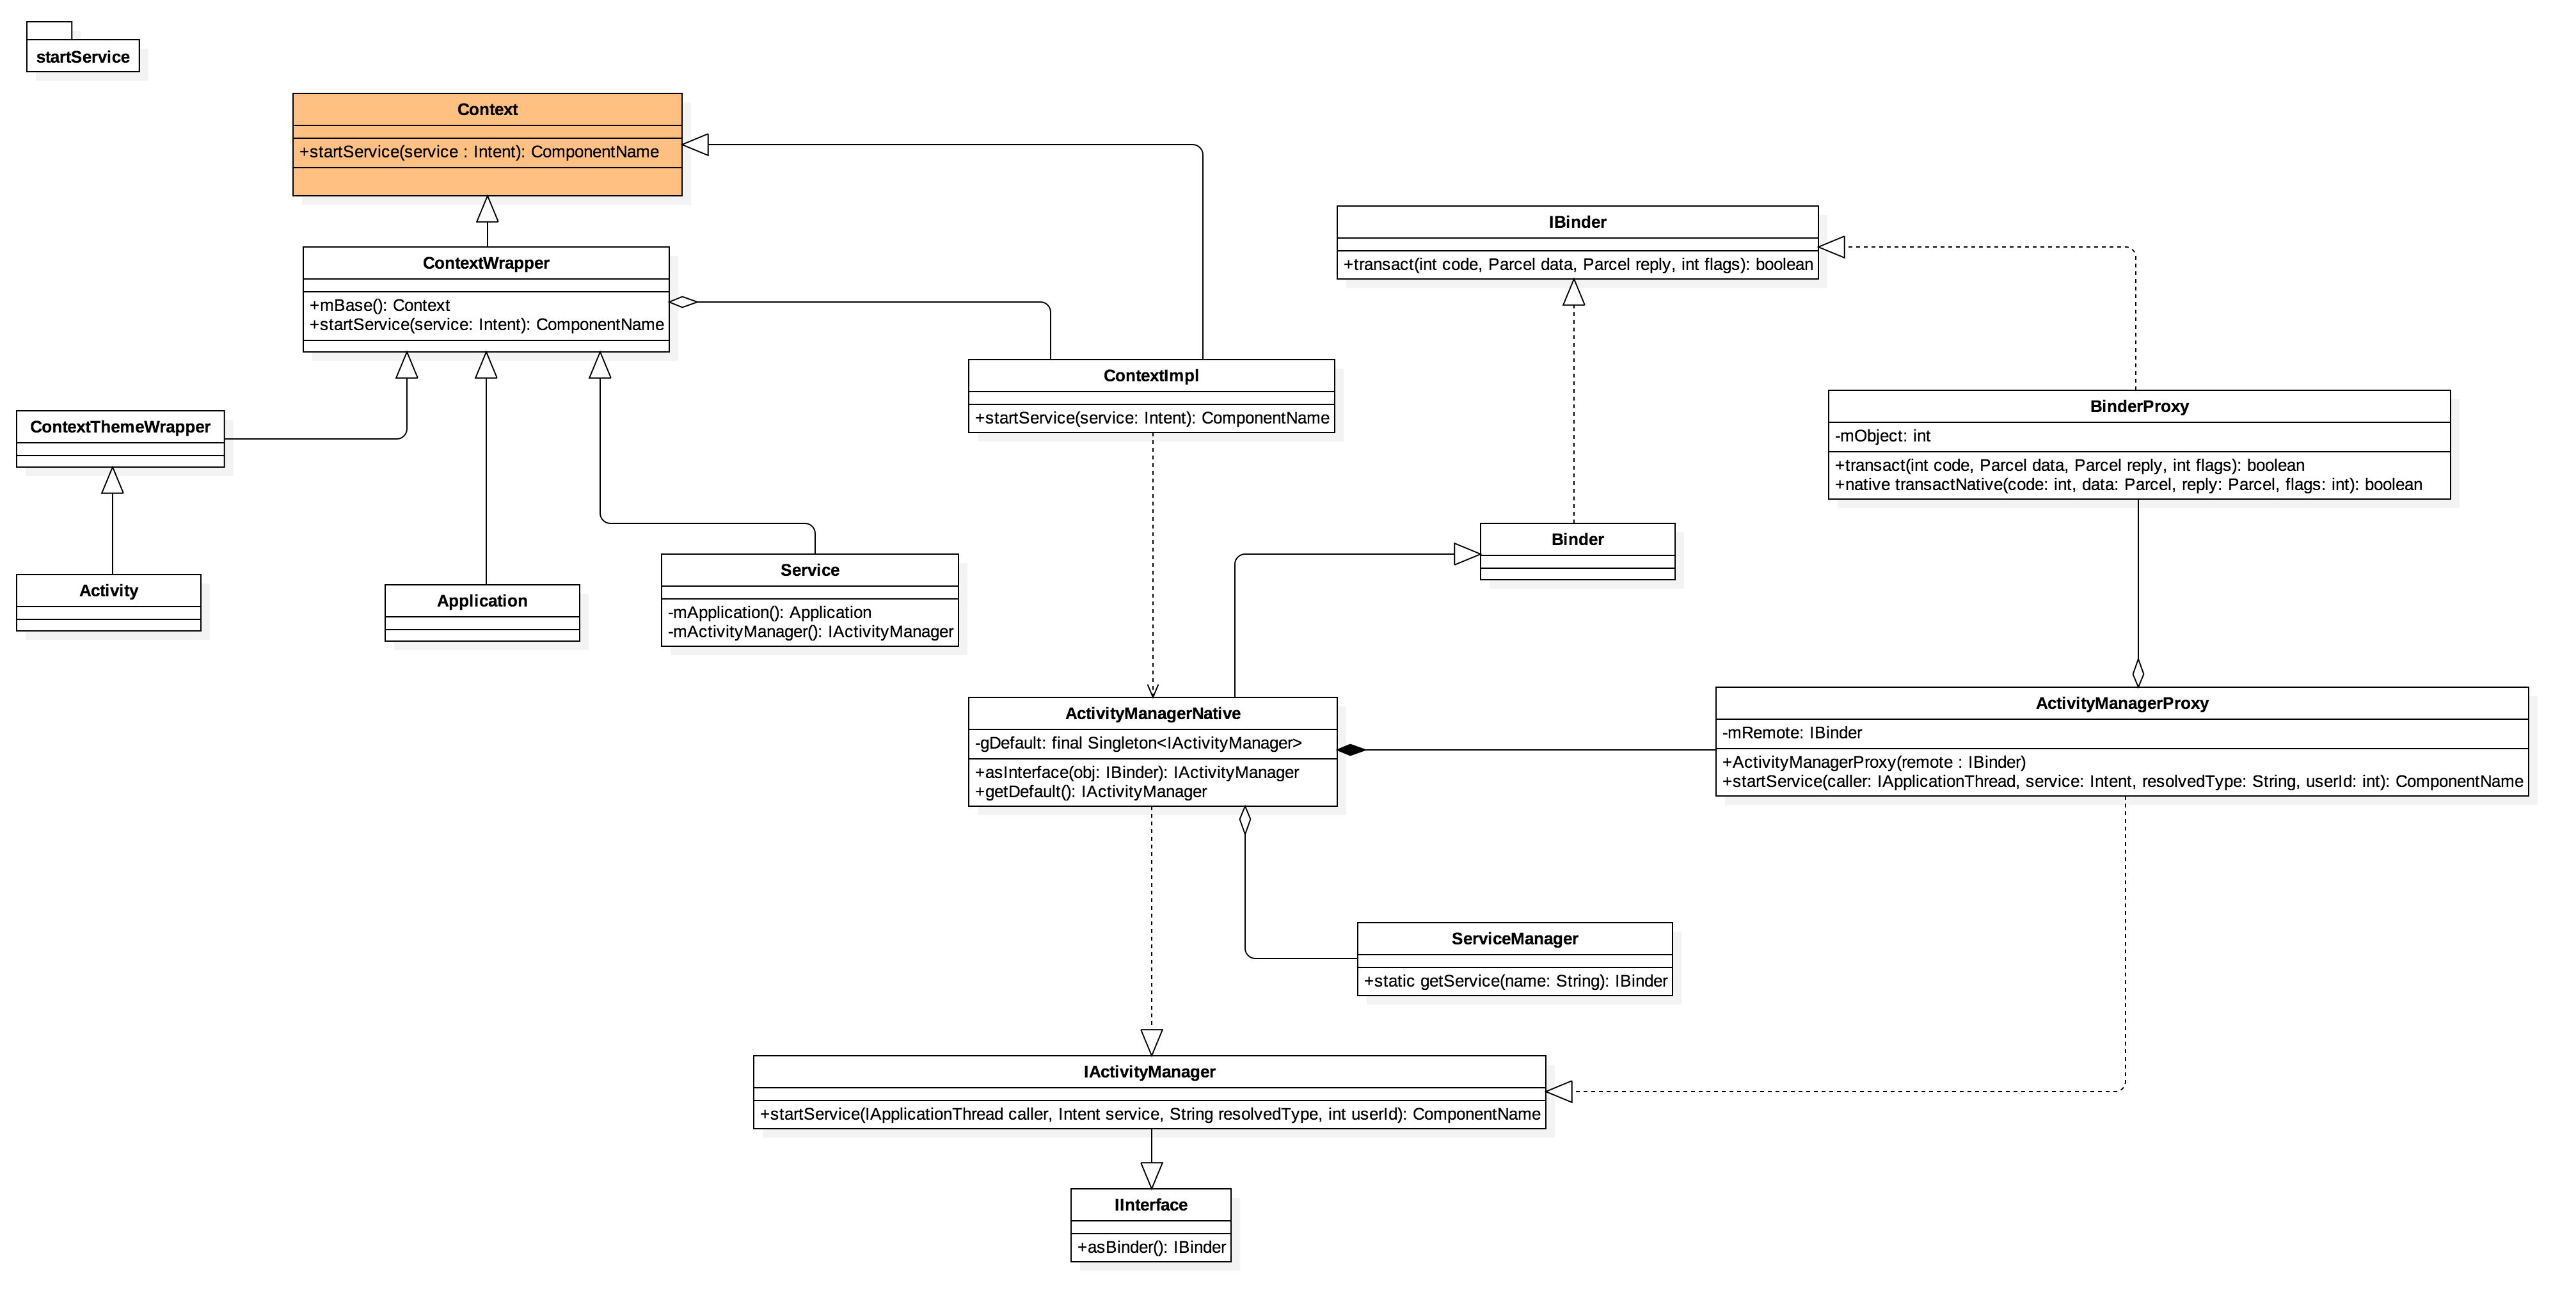
关联startService相关类图

不难发现startService可以有多个入口调用,原因看如下类图:

  1. Activity、Application、Service都是继承ContextWrapper,其中Service拥有Applcation实例。

  2. 在ContextWrapper类中,实现了startService函数。在ContextWrapper类中,有一个成员变量mBase,它是一个ContextImpl实例。

  3. ContextImpl类和ContextWrapper类一样继承于Context类,ContextWrapper类的startService函数最终过调用ContextImpl类的startService函数来实现。这种类设计方法在设计模式里面,就称之为装饰模式(Decorator),或者包装模式(Wrapper)。

  4. 在ContextImpl类的startService类,最终又调用了ActivityManagerProxy类的startService来实现启动服务的操作

1
2
3
4
5
6
7
8
9
10
11
12
13
14
15
16
17
18
19
20
21
22
23
private ComponentName startServiceCommon(Intent service, UserHandle user) {
try {
validateServiceIntent(service);
service.prepareToLeaveProcess();
ComponentName cn = ActivityManagerNative.getDefault().startService(
mMainThread.getApplicationThread(), service,
service.resolveTypeIfNeeded(getContentResolver()), user.getIdentifier());
if (cn != null) {
if (cn.getPackageName().equals("!")) {
throw new SecurityException(
"Not allowed to start service " + service
+ " without permission " + cn.getClassName());
} else if (cn.getPackageName().equals("!!")) {
throw new SecurityException(
"Unable to start service " + service
+ ": " + cn.getClassName());
}
}
return cn;
} catch (RemoteException e) {
return null;
}
}

结合ServiceManager和类图我们可以知道ActivityManagerProxy是一个Binder对象的远程接口了,ServiceManagerProxy远程对象是C层的ServiceManager,而ActivityManagerProxy这个Binder远程对象就是ActivityManagerService了。在手机启动时会初始化这个Binder,我们看下源码:

1
2
3
4
5
6
7
8
9
10
11
12
13
14
15
16
17
18
19
20
21
22
23
24
25
26
27
28
29
30
31
32
33
34
35
36
37
38
39
40
41
42
43
44
45
46
47
48
49
50
51
52
53
54
55
56
57
58
59
60
61
62
63
64
65
66
67
68
69
70
71
72
73
74
75
76
public class SystemServer {
private static final String TAG = "SystemServer";

public static final int FACTORY_TEST_OFF = 0;
public static final int FACTORY_TEST_LOW_LEVEL = 1;
public static final int FACTORY_TEST_HIGH_LEVEL = 2;

static Timer timer;
static final long SNAPSHOT_INTERVAL = 60 * 60 * 1000; // 1hr

// The earliest supported time. We pick one day into 1970, to
// give any timezone code room without going into negative time.
private static final long EARLIEST_SUPPORTED_TIME = 86400 * 1000;

/**
* Called to initialize native system services.
*/
private static native void nativeInit();

public static void main(String[] args) {

/*
* In case the runtime switched since last boot (such as when
* the old runtime was removed in an OTA), set the system
* property so that it is in sync. We can't do this in
* libnativehelper's JniInvocation::Init code where we already
* had to fallback to a different runtime because it is
* running as root and we need to be the system user to set
* the property. http://b/11463182
*/
SystemProperties.set("persist.sys.dalvik.vm.lib",
VMRuntime.getRuntime().vmLibrary());

if (System.currentTimeMillis() < EARLIEST_SUPPORTED_TIME) {
// If a device's clock is before 1970 (before 0), a lot of
// APIs crash dealing with negative numbers, notably
// java.io.File#setLastModified, so instead we fake it and
// hope that time from cell towers or NTP fixes it
// shortly.
Slog.w(TAG, "System clock is before 1970; setting to 1970.");
SystemClock.setCurrentTimeMillis(EARLIEST_SUPPORTED_TIME);
}

if (SamplingProfilerIntegration.isEnabled()) {
SamplingProfilerIntegration.start();
timer = new Timer();
timer.schedule(new TimerTask() {
@Override
public void run() {
SamplingProfilerIntegration.writeSnapshot("system_server", null);
}
}, SNAPSHOT_INTERVAL, SNAPSHOT_INTERVAL);
}

// Mmmmmm... more memory!
dalvik.system.VMRuntime.getRuntime().clearGrowthLimit();

// The system server has to run all of the time, so it needs to be
// as efficient as possible with its memory usage.
VMRuntime.getRuntime().setTargetHeapUtilization(0.8f);

Environment.setUserRequired(true);

System.loadLibrary("android_servers");

Slog.i(TAG, "Entered the Android system server!");

// Initialize native services.
nativeInit();

// This used to be its own separate thread, but now it is
// just the loop we run on the main thread.
ServerThread thr = new ServerThread();
thr.initAndLoop();
}
}
1
2
3
4
5
6
7
8
9
10
11
12
13
14
15
16
17
18
19
20
21
22
23
24
25
26
27
28
29
class ServerThread {
private static final String TAG = "SystemServer";
private static final String ENCRYPTING_STATE = "trigger_restart_min_framework";
private static final String ENCRYPTED_STATE = "1";

ContentResolver mContentResolver;

void reportWtf(String msg, Throwable e) {
Slog.w(TAG, "***********************************************");
Log.wtf(TAG, "BOOT FAILURE " + msg, e);
}

public void initAndLoop() {
try {
...
context = ActivityManagerService.main(factoryTest);
} catch (RuntimeException e) {
Slog.e("System", "******************************************");
Slog.e("System", "************ Failure starting bootstrap service", e);
}

try {
...
ActivityManagerService.setSystemProcess();
}catch (RuntimeException e) {
Slog.e("System", "******************************************");
Slog.e("System", "************ Failure starting core service", e);
}
}

系统启动时,会通过ActivityManagerService.main()创建出实例,通过ActivityManagerService.setSystemProcess();将服务添加到Service Manager中

1
2
3
4
5
6
7
8
9
10
11
12
13
14
15
16
17
18
19
20
21
22
23
24
25
26
27
28
29
30
31
32
33
34
35
36
37
38
39
40
public final class ActivityManagerService extends ActivityManagerNative
implements Watchdog.Monitor, BatteryStatsImpl.BatteryCallback {

public static final Context main(int factoryTest) {
AThread thr = new AThread();
thr.start();

synchronized (thr) {
while (thr.mService == null) {
try {
thr.wait();
} catch (InterruptedException e) {
}
}
}

ActivityManagerService m = thr.mService;
mSelf = m;

...

m.startRunning(null, null, null, null);

return context;
}


public static void setSystemProcess() {
try {
ActivityManagerService m = mSelf;

ServiceManager.addService(Context.ACTIVITY_SERVICE, m, true);
...
} catch (PackageManager.NameNotFoundException e) {
throw new RuntimeException(
"Unable to find android system package", e);
}
}

}

这样就把ActivityManagerService这个Binder添加到Service Manager中,之后通信的时候,需要通过代理去获取它。这样ActivityManagerService就启动了。

  1. 现在知道ActivityManagerProxy.startService是通过ActivityManagerService的startService

  2. ActivityManagerProxy的mBinder持有ActivityManagerService Binder的引用,执行接口赋予的功能

问题来源

在调研notification时,这里涉及多个进程间的通信。并且在调研push通知开关状态时,涉及到framework的源码分析。所有,对系统想做一个系统的分析学习。

在framework/services/java/com/android/server/SystemServer.java中

1
2
3
4
5
6
7
8
9
10
11
12
13
14
15
16
17
18
19
20
21
22
23
24
25
26
27
28
29
30
31
32
33
34
35
36
37
38
39
40
41
42
43
44
45
46
47
48
49
50
51
52
53
54
55
56
57
58
59
60
61
62
63
64
65
66
67
68
69
70
public class SystemServer {


...
...
private static native void nativeInit();


public static void main(String[] args) {

SystemProperties.set("persist.sys.dalvik.vm.lib",

VMRuntime.getRuntime().vmLibrary());

if (System.currentTimeMillis() < EARLIEST_SUPPORTED_TIME) {

Slog.w(TAG, "System clock is before 1970; setting to 1970.");

SystemClock.setCurrentTimeMillis(EARLIEST_SUPPORTED_TIME);

}

if (SamplingProfilerIntegration.isEnabled()) {

SamplingProfilerIntegration.start();

timer = new Timer();

timer.schedule(new TimerTask() {

@Override

public void run() {

SamplingProfilerIntegration.writeSnapshot("system_server", null);

}

}, SNAPSHOT_INTERVAL, SNAPSHOT_INTERVAL);

}

// Mmmmmm... more memory!

dalvik.system.VMRuntime.getRuntime().clearGrowthLimit();

// The system server has to run all of the time, so it needs to be

// as efficient as possible with its memory usage.

VMRuntime.getRuntime().setTargetHeapUtilization(0.8f);

Environment.setUserRequired(true);

System.loadLibrary("android_servers");

Slog.i(TAG, "Entered the Android system server!");

// Initialize native services.

nativeInit();
// This used to be its own separate thread, but now it is

// just the loop we run on the main thread.

ServerThread thr = new ServerThread();

thr.initAndLoop();

}

这里存在一个java的main函数的入口,这个是初始化应用层相关服务的,我们分析initAndLoop,这个方法里面包含初始化各种系统的Service,而这些都是通过ServiceManager去做的。

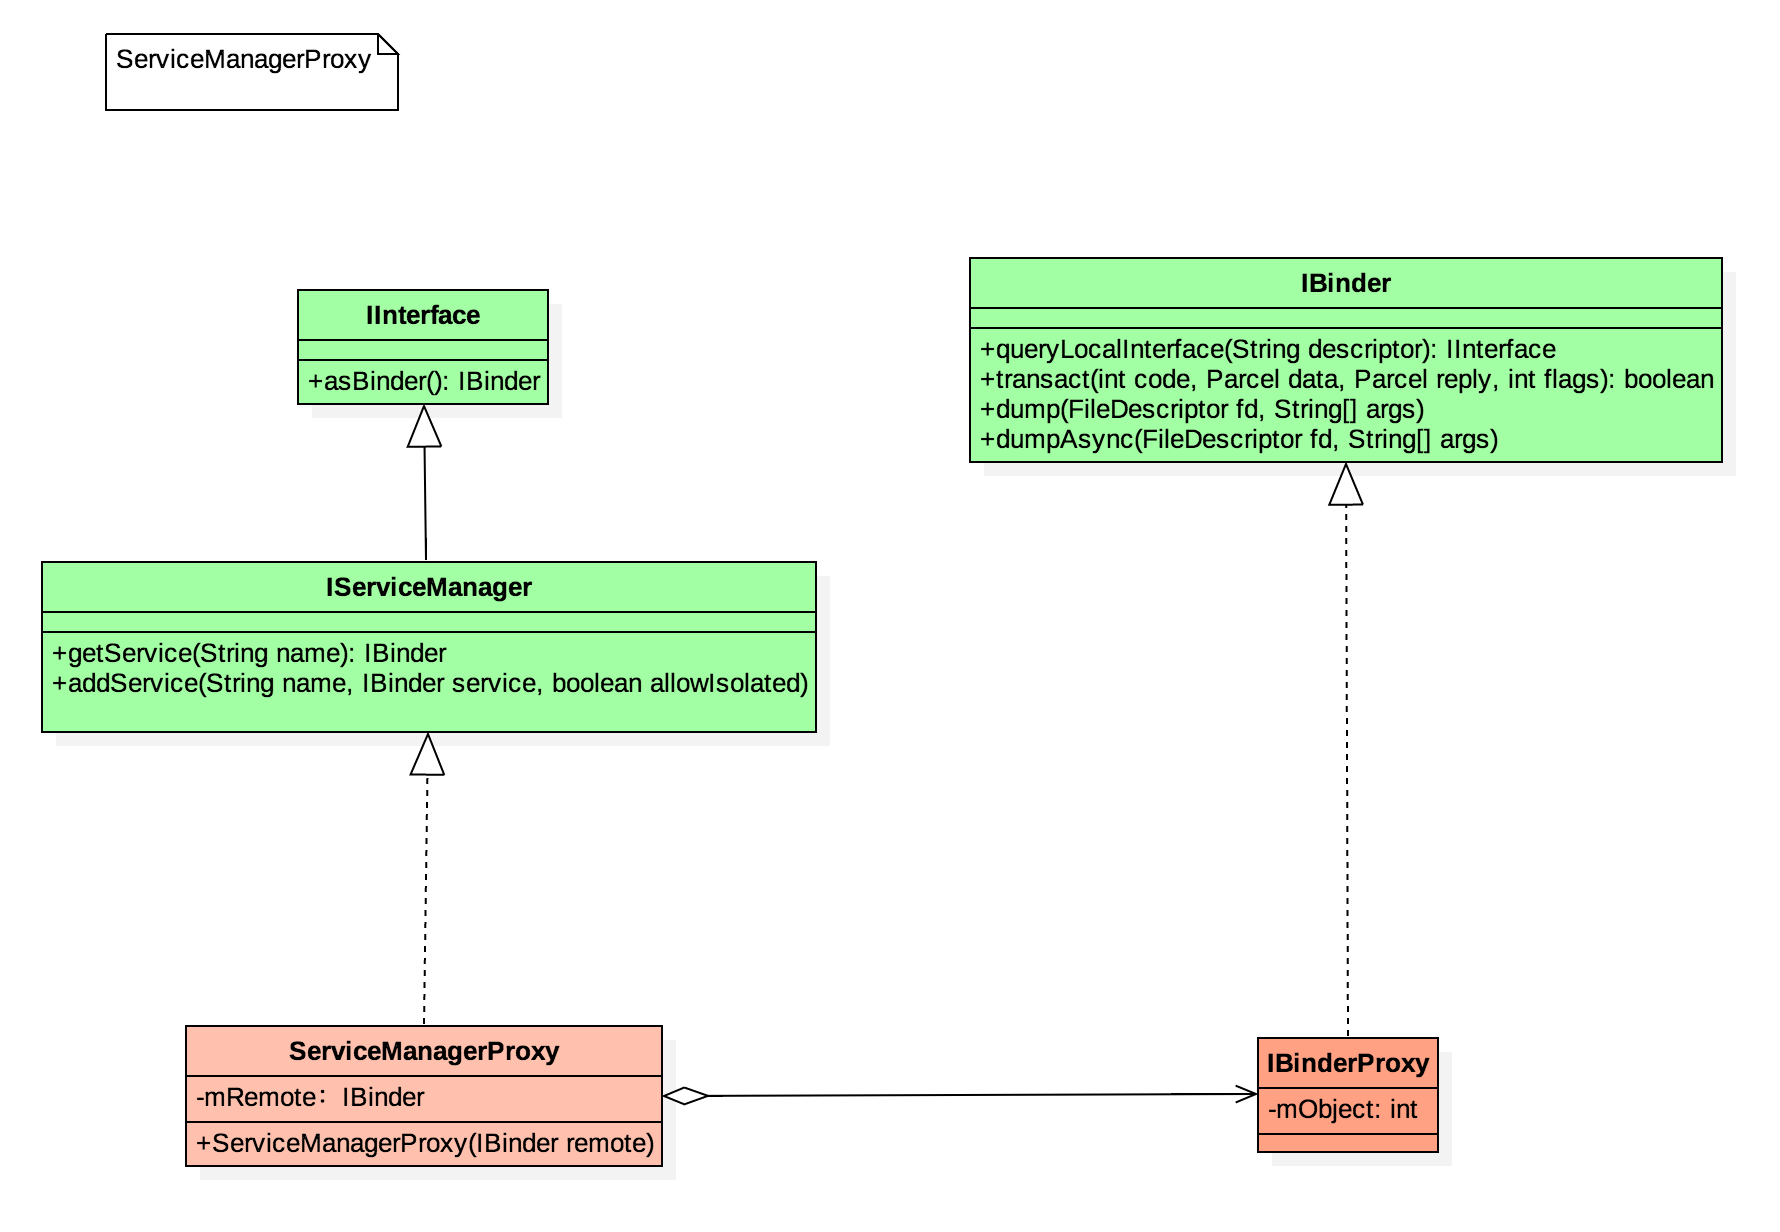
我们需要获取的ServiceManager的Java远程接口是一个ServiceManagerProxy对象的IServiceManager接口。ServiceManagerProxy类图结构:

从上图可以知道ServiceManagerProxy类实现了IServiceManager接口,IServiceManager提供了getService和addService两个成员方法来管理系统中的Service。在ServiceManagerProxy类的构造函数可以得知需要一个BinderProxy对象的IBinder接口来作为参数。因此,要获取ServiceManager的Java远程接口ServiceManagerProxy,首先要有一个BinderProxy对象。BinderProxy对象是如何获得的?

我们先看看ServiceManager里面做了些什么

我想知道这些Service是如何去通信的,我们看下在ServiceManager中的代码

1
2
3
4
5
6
7
8
9
10
11
12
13
14
15
16
17
18
19
20
21
/** @hide */

public final class ServiceManager {

private static final String TAG = "ServiceManager";
private static IServiceManager sServiceManager;
private static HashMap<String, IBinder> sCache = new HashMap<String, IBinder>();
private static IServiceManager getIServiceManager() {

if (sServiceManager != null) {
return sServiceManager;
}
// Find the service manager
sServiceManager = ServiceManagerNative.asInterface(BinderInternal.getContextObject());
return sServiceManager;

}

...
...
}

在上面贴出了ServiceManager的一个静态方法
getIServiceManager
这个方法是获取Java远程接口,getIServiceManager内部是通过方法
ServiceManagerNative.asInterface(BinderInternal.getContextObject())
去获取远程接口。在调用ServiceManagerNative.asInterface方法之前是需要传入一个参数,这个参数是
BinderInternal.getContextObject()返回的值。我们看下这个方法到底是什么鬼:

1
2
3
4
5
6
7
8
9
10
11
12
13
14
15
16
17
18
19
20
21
22
23
24
25
26
27
/**

* Private and debugging Binder APIs.

*

* @see IBinder

*/

public class BinderInternal {

...
/**

* Return the global "context object" of the system. This is usually

* an implementation of IServiceManager, which you can use to find

* other services.

*/

public static final native IBinder getContextObject();

...
}

BinderInternal.getContextObject是一个JNI方法,返回的值是IBinder类型,在framework搜索这个方法的JNI实现

1
2
3
4
5
6
7
8
9
static jobject android_os_BinderInternal_getContextObject(JNIEnv* env, jobject clazz)

{

sp<IBinder> b = ProcessState::self()->getContextObject(NULL);

return javaObjectForIBinder(env, b);

}

首先是调用ProcessState::self函数,self函数是ProcessState的静态成员函数,它的作用是返回一个全局唯一的ProcessState实例变量,就是单例模式了,这个变量名为gProcess。如果gProcess尚未创建,就会执行创建操作,在ProcessState的构造函数中,会通过open文件操作函数打开设备文件/dev/binder,并且返回来的设备文件描述符保存在成员变量mDriverFD中。
接着调用gProcess->getContextObject函数来获得一个句柄值为0的Binder引用,即BpBinder了,相似的代码:

1
sp<IBinder> b = new BpBinder(0);

我们在看看ServiceManagerNative.asInterface里面的代码

1
2
3
4
5
6
7
8
9
10
11
12
13
14
15
16
17
18
19
20
21
22
23
24
25
26
27
28
29
30
31
32
33
34
35
36
37
38
39
40
41
42
43
44
45
46
/**

* Native implementation of the service manager. Most clients will only

* care about getDefault() and possibly asInterface().

* @hide

*/

public abstract class ServiceManagerNative extends Binder implements IServiceManager

{

/**

* Cast a Binder object into a service manager interface, generating

* a proxy if needed.

*/

static public IServiceManager asInterface(IBinder obj)

{

if (obj == null) {

return null;

}

IServiceManager in = (IServiceManager)obj.queryLocalInterface(descriptor);

if (in != null) {

return in;

}

return new ServiceManagerProxy(obj);

}
...
...
}

在静态方法asInterface里面需要一个IBinder的参数,就是一个代理对象,如果当地不存在描述的IServiceManager那么就通过这个BinderProxy去创建一个。

那我们在创建AIDL文件时,系统到底做了什么?

春节过后,渐渐进入了工作的状态。在这些天中,主动提出要优化公司产品的下载模块多线程,目前产品是多任务单线程下载模式,这样一旦网络不行的情况下,下载会变的异常或者缓慢。加入文件的多线程下载是每个下载模块的标配了,之前也没有接触这块,所以也算是给自己一个挑战吧。

对下载模块的Api使用

  1. 一个模块简单易用是最基本的要求
  2. 配置简单

分析梳理现有的模块和思路

大致的任务启动分析路径

![](./%E4%B8%8B%E8%BD%BD%E6%A8%A1%E5%9D%97%E5%A4%9A%E7%BA%BF%E7%A8%8B%E5%AE%9E%E7%8E%B0%E4%B9%8B%E8%B7%AF/img/FlowchartDiagram下载模块流程图.png %}

多线程下载原理

  1. 多线程下载是将文件分成多段,然后从分割段开始下载,多线程需要服务器支持断点续传特性。
  2. 文件存储和IO,关于文件存储写入的问题也有很多方案,目前采用的方案是预创建整个文件大小,然后利用文件的seek找到对应指针的位置。
  3. 对于每个任务我们会有一张表记录每个任务中的线程下载记录,然后同步数据从而实现多线程的文件下载,每个任务ID对应其任务的线程。
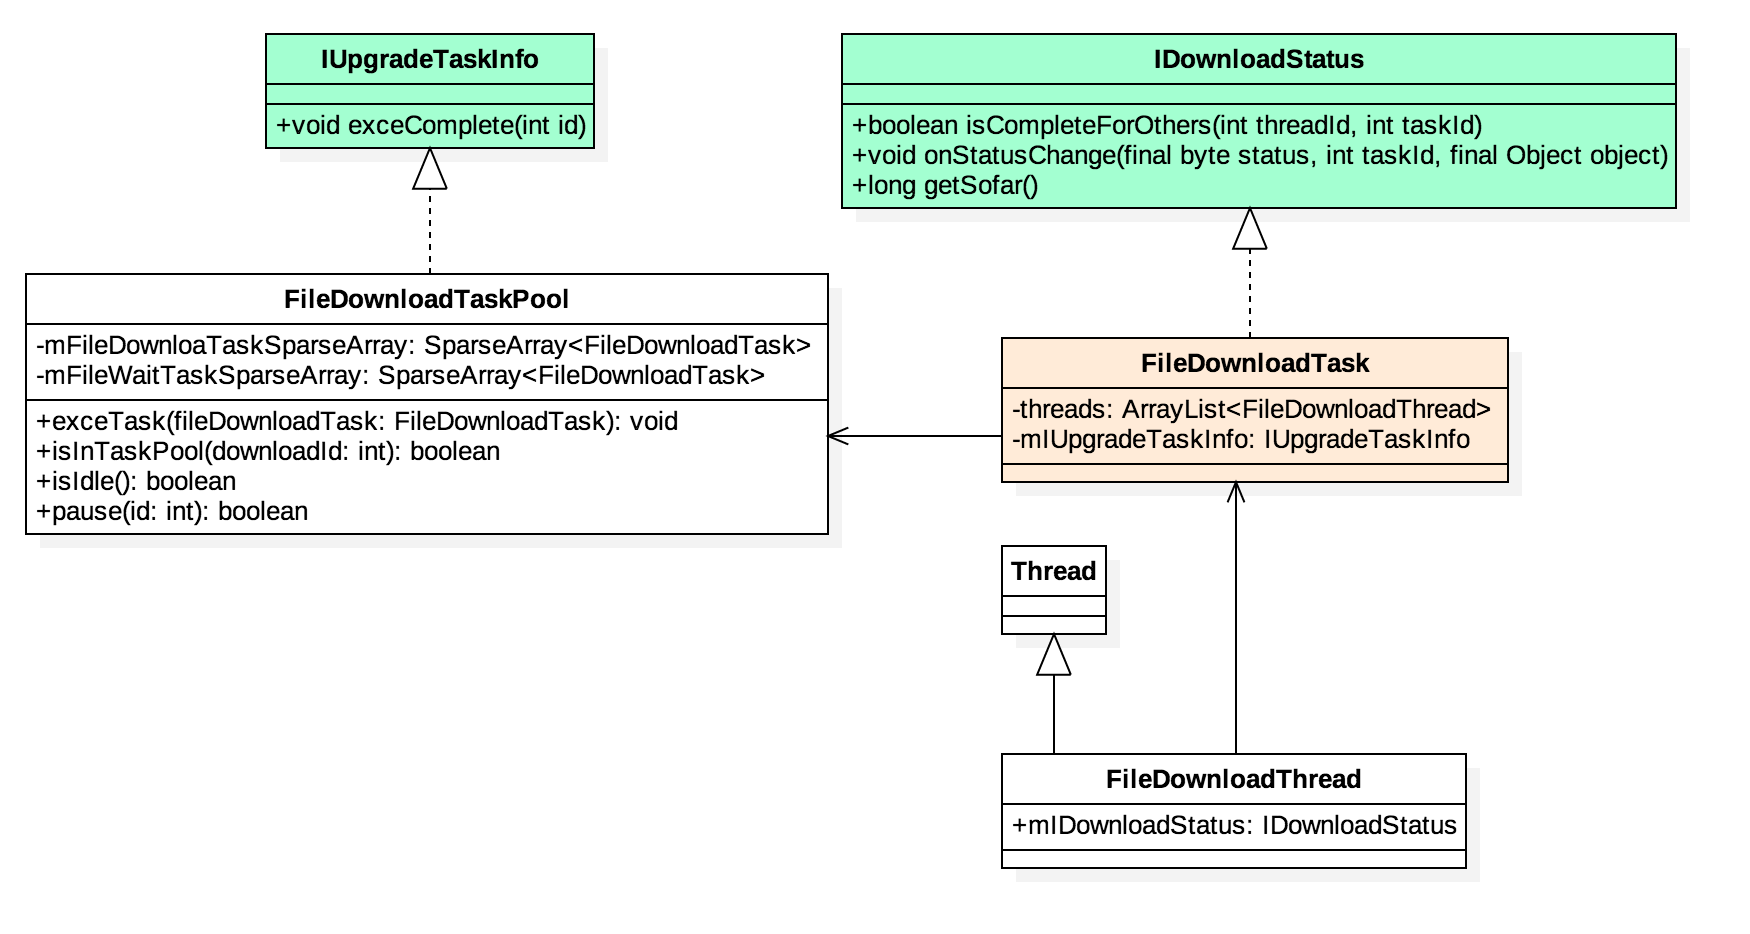
  4. 多线程不可避免会出现线程同步问题,基本做法是当前线程需要知道兄弟线程下载的状态,我们定义了一组线程间状态读取接口,同步线程数组锁,询问兄弟线程isCompleteForOthers
  5. 为了更好的承接上层业务我们封装了业务层,使接入成本降低

实现多线程核心类图构成:

文件IO

对于文件IO这块,我们使用了Okio做为文件IO的底层工具,使用RandomAccessFile来实现文件的seek,从而实现文件的断点操作。为了最大化的加快文件的写入操作,我们加入了文件的预创建过程。

IO性能测试

这里的测试数据是将内存中的10MB的数据写入到磁盘的平均时间

FileOutputStream BufferedOutputStream RandomAccessFile BufferedSink
2983 2461 2369 2369
2493 5073 2430 2393
2780 2460 2421 2389
2492 2966 2427 2361
2870 2501 2570 2365
2490 3011 2430 2372
2963 2559 2400 2361
2493 2446 2438 2346
2615 4811 2400 2367
2518 3010 2398 2344

平均值:

2669.7 3129.8 2428.3 2366.7

这里的测试环境是有一个文件输入流,一个文件的输出流,然后每次读取相同的BUFFER_SIZE = 1024 * 8 来测试IO性能

FileOutputStream BufferedOutputStream RandomAccessFile BufferedSink
2144 2162 2265 2313
2447 3991 2205 2313
2211 2241 2196 2309
2474 2276 2191 2293
2230 2446 2184 2338
3305 2305 2201 2329
4772 2191 2827 2271
2418 2304 2795 2294
2319 2204 2166 2279
2316 2261 2797 2244

平均值:

2663.6 2438.1 2382.7 2298.3

可以从上面的数据看出,使用Okio文件写入非常稳定。

预创建文件

1
2
3
4
5
6
7
8
9
10
11
12
13
14
15
16
17
18
19
20
21
22
23
24
25
26
27
28
29
30
31
32
33
34
35
36
37
38
39
40
41
42
43
44
45
46
47
48
49
50
51
52
53
54
55
56
57
58
59
60
61
62
63
64
65

public static long KBSIZE = 1024;
public static long MBSIZE1 = 1024 * 1024;
public static long MBSIZE10 = 1024L * 1024 * 10;

public static boolean createFile(File file, long fileLength, final ValueCallback valueCallback) {
FileOutputStream fos = null;
try {

if (!file.exists()) {
boolean ret = file.createNewFile();
if (!ret) return false;
}

long batchSize = 0;
batchSize = fileLength;
if (fileLength > KBSIZE) {
batchSize = KBSIZE;
}
if (fileLength > MBSIZE1) {
batchSize = MBSIZE1;
}
if (fileLength > MBSIZE10) {
batchSize = MBSIZE10;
}
long count = fileLength / batchSize;
long last = fileLength % batchSize;

fos = new FileOutputStream(file);
FileChannel fileChannel = fos.getChannel();
for (long i = 0; i < count; i++) {
ByteBuffer buffer = ByteBuffer.allocate((int) batchSize);
fileChannel.write(buffer);

if (i % 3 == 0 && valueCallback != null) {
float x = i;
float y = count;
int progress = (int) ((x / y) * 100);
valueCallback.onReceiveValue(progress);
}
}

ByteBuffer buffer = ByteBuffer.allocate((int) last);
fileChannel.write(buffer);

if (valueCallback != null) {
valueCallback.onReceiveValue(100);
}

return true;

} catch (IOException e) {
e.printStackTrace();
} finally {
try {
if (fos != null) {
fos.close();
}
} catch (IOException e) {
e.printStackTrace();
}
}
return false;
}

测试用例图

开始一个任务,上层任务保留了文件的基本特性,使用方式:

1
2
3
4
5
6
7
8
9
10
11
12
13
14
15
16
private void startTask(String url, String contentDisposition, String mimetype) {
String mT = MimeUtils.guessMimeTypeFromExtension(MimeUtils.getFileExtensionFromFileName(MimeUtils.guessFileName(url, contentDisposition, mimetype)));
ProDownloadRequest request = new ProDownloadRequest.Builder()
.url(url)
.title(MimeUtils.guessFileName(url, contentDisposition, mimetype))
.refUrl(url)
.mimeType(StringUtils.isEmpty(mT) ? mimetype : mT)
.build();

ProDownloadManager.getInstance().createTask(request).addOnStateChangeListener(new OnStateChangeListener() {
@Override
public void onStateChange(ProDownloadTask task, int status, long sofar, long total) {
//your code
}
}).start();
}

去年浪费了许多时间,很多自己想要做的事情偷懒没有做,或者总因为工作忙的原因而搁置。我是一个不甘安逸、不服输的人。2017刚开始,我需要有一个自己的目标,这个目标并不是要在工作中有多少突破,而是我希望自己更好的规划自己的时间,留出一部分时间做自己想要去做的事情。

几天的一个人的日子

初八回广州,一个人,第一次感觉到了孤单,什么也不想做,什么也不去想。甚至我陪一直着一只流浪猫玩。经过几天的,我开始想起自己当初想要的日子,人生需要计划,需要去实践,更需要恒心。

多写写自己的博客

在工作中,很多东西都没能仔细深探究,总是徘徊在完成任务。现在自己逐渐突破了这个,对于一个项目我都会去查看其细节,然后写自己的分析,记录下来。

多花时间看书

之前的工作习惯,都会不定时看书,现在看书的频率很低。这里给自己一个定一个目标,看完一本一位博主写的Android开发总结,并自己也写下自己的分析理解。

少玩游戏,最好不玩

我自己比较贪玩,经常会玩游戏而忘记一切,不服输的态度让我一晚就停不下来,现在自己玩游戏也渐渐很少了。多用这些时间看看电影,出去和朋友聊聊天。

由于项目需要,我对接二维码模块,经过自己的优化,目前效果还不错,网上给出的方案大多数都是复制过来的,没有经过深度思考。所以我决定纪录下来自己优化的地方,供以后自己参考。

项目地址

github-vanda-伍中联-QrCode

二维码模块

二维码这块经过了初步的封装处理,没有Activity,没有Fragment,只有View,最终使用二维码的形式如下:

1
2
3
4
5
6
7
8
9
10
11
12
13
14
15
16
17
18
19
20
21
22
23
24
25
26
27
28
29
30
31
32
33
34
35
36
37
38
39
40
41
42
43
44
45
46
47
48
49
50
51
52
53
54
55
56
private QrCodeView mQrCodeView;

@Override
protected void onCreate(Bundle savedInstanceState) {
super.onCreate(savedInstanceState);

mQrCodeView = new QrCodeView(this, null);
mQrCodeView.registerResultCallback(this);
mQrCodeView.setText(getString(R.string.qrcode_desc));

setContentView(mQrCodeView);
}

@Override
public void onPause() {
super.onPause();
if (mQrCodeView != null) {
mQrCodeView.onPause();
}
}

@Override
public void onResume() {
super.onResume();
if (mQrCodeView != null) {
mQrCodeView.onResume();
}
}

@Override
public void onDestroy() {
super.onDestroy();
if (mQrCodeView != null) {
mQrCodeView.onDestroy();
mQrCodeView = null;
}
}

@Override
public void onResultCallback(Result result) {
if (result != null) {
if (mQrCodeView != null) {
mQrCodeView.onPause();
}
new android.support.v7.app.AlertDialog.Builder(this).setTitle(result.getText())
.setCancelable(true)
.setOnDismissListener(new DialogInterface.OnDismissListener() {
@Override
public void onDismiss(DialogInterface dialogInterface) {
if (mQrCodeView != null) {
mQrCodeView.onResume();
}
}
}).create().show();
}
}
  1. 二维码使用了zxing库,我保留了二维码和条形码的和一些常用的格式
  2. 大多数项目要求是竖屏进行扫描,本优化是针对竖屏下的优化

相机的拍摄图像的原始数据图像

相机回调的原始数据图像是横着的。回调代码如下:

1
2
3
4
5
6
7
8
9
10
11
12
13
14
public void onPreviewFrame(byte[] data, Camera camera) {
Point cameraResolution = configManager.getCameraResolution();
if (!useOneShotPreviewCallback) {
camera.setPreviewCallback(null);
}
if (previewHandler != null) {
Message message = previewHandler.obtainMessage(previewMessage, cameraResolution.x,
cameraResolution.y, data);
message.sendToTarget();
previewHandler = null;
} else {
Log.d(TAG, "Got preview callback, but no handler for it");
}
}

byte[] data这个是预览图中的相机的原始数据,这个数据是比较大的,原始图像如下:

这个是原始图像,这个图像是横着的,然后我们需要对这张图片做出相应的处理。

如何处理相机获取来的图片

我Google了很多关于二维码竖屏下的实现方案,给出网上一大片的实现方案(这种方案没有仔细思考,也反映了国内程序员们的急躁):

  1. 图片是横着的,那么就需要将相机图像摆正
  2. 显示在手机屏幕上摆正只是相机显示,最终回调的图片数据还是横着的,所以还需要转换图像为竖屏的(这个数据量是比较大的)
  3. 根据二维码框对应手机屏幕位置找到图片相对位置
  4. 找到对应的位置进行裁剪
  5. 交给解码库解码

我针对以上的点做出代码上的说明:

  1. 图片是横着的,那么就需要将相机图像摆正,需要找到正确的相机方向,这段代码就是找到相机方向
1
2
3
4
5
6
7
8
9
10
11
12
13
14
15
16
17
18
19
20
21
22
23
24
25
26
27
28
29
30
31
32
33
34
35
36
37
38
39
40
41
42
43
44
45
46
47
48
49
50
51
52
53
54
55
56
57
58
59
60
61
62
63
64
65
66
67
68
69
70
71
72
73
74
75
76
77
78
79
80
81
82
83
84
85
86
/**
* Reads, one time, values from the camera that are needed by the app.
*/
void initFromCameraParameters(OpenCamera camera) {
Camera.Parameters parameters = camera.getCamera().getParameters();
WindowManager manager = (WindowManager) context.getSystemService(Context.WINDOW_SERVICE);
Display display = manager.getDefaultDisplay();

int displayRotation = display.getRotation();
int cwRotationFromNaturalToDisplay;
switch (displayRotation) {
case Surface.ROTATION_0:
cwRotationFromNaturalToDisplay = 0;
break;
case Surface.ROTATION_90:
cwRotationFromNaturalToDisplay = 90;
break;
case Surface.ROTATION_180:
cwRotationFromNaturalToDisplay = 180;
break;
case Surface.ROTATION_270:
cwRotationFromNaturalToDisplay = 270;
break;
default:
// Have seen this return incorrect values like -90
if (displayRotation % 90 == 0) {
cwRotationFromNaturalToDisplay = (360 + displayRotation) % 360;
} else {
throw new IllegalArgumentException("Bad rotation: " + displayRotation);
}
}
Log.i(TAG, "Display at: " + cwRotationFromNaturalToDisplay);

int cwRotationFromNaturalToCamera = camera.getOrientation();
Log.i(TAG, "Camera at: " + cwRotationFromNaturalToCamera);

// Still not 100% sure about this. But acts like we need to flip this:
if (camera.getFacing() == CameraFacing.FRONT) {
cwRotationFromNaturalToCamera = (360 - cwRotationFromNaturalToCamera) % 360;
Log.i(TAG, "Front camera overriden to: " + cwRotationFromNaturalToCamera);
}

/*
SharedPreferences prefs = PreferenceManager.getDefaultSharedPreferences(context);
String overrideRotationString;
if (camera.getFacing() == CameraFacing.FRONT) {
overrideRotationString = prefs.getString(Config.KEY_FORCE_CAMERA_ORIENTATION_FRONT, null);
} else {
overrideRotationString = prefs.getString(Config.KEY_FORCE_CAMERA_ORIENTATION, null);
}
if (overrideRotationString != null && !"-".equals(overrideRotationString)) {
Log.i(TAG, "Overriding camera manually to " + overrideRotationString);
cwRotationFromNaturalToCamera = Integer.parseInt(overrideRotationString);
}
*/

cwRotationFromDisplayToCamera =
(360 + cwRotationFromNaturalToCamera - cwRotationFromNaturalToDisplay) % 360;
Log.i(TAG, "Final display orientation: " + cwRotationFromDisplayToCamera);
if (camera.getFacing() == CameraFacing.FRONT) {
Log.i(TAG, "Compensating rotation for front camera");
cwNeededRotation = (360 - cwRotationFromDisplayToCamera) % 360;
} else {
cwNeededRotation = cwRotationFromDisplayToCamera;
}
Log.i(TAG, "Clockwise rotation from display to camera: " + cwNeededRotation);

Point theScreenResolution = new Point();
display.getSize(theScreenResolution);
screenResolution = theScreenResolution;
Log.i(TAG, "Screen resolution in current orientation: " + screenResolution);
cameraResolution = CameraConfigurationUtils.findBestPreviewSizeValue(parameters, screenResolution);
Log.i(TAG, "Camera resolution: " + cameraResolution);
bestPreviewSize = CameraConfigurationUtils.findBestPreviewSizeValue(parameters, screenResolution);
Log.i(TAG, "Best available preview size: " + bestPreviewSize);

boolean isScreenPortrait = screenResolution.x < screenResolution.y;
boolean isPreviewSizePortrait = bestPreviewSize.x < bestPreviewSize.y;

if (isScreenPortrait == isPreviewSizePortrait) {
previewSizeOnScreen = bestPreviewSize;
} else {
previewSizeOnScreen = new Point(bestPreviewSize.y, bestPreviewSize.x);
}
Log.i(TAG, "Preview size on screen: " + previewSizeOnScreen);
}

设置相机的参数

1
2
3
4
5
6
7
8
9
10
11
12
13
14
15
16
17
18
19
void setDesiredCameraParameters(OpenCamera camera, boolean safeMode) {
Camera theCamera = camera.getCamera();
Camera.Parameters parameters = theCamera.getParameters();

Log.d(TAG, "Setting preview size: " + cameraResolution);
parameters.setPreviewSize(cameraResolution.x, cameraResolution.y);
setFlash(parameters);
setZoom(parameters);
theCamera.setDisplayOrientation(cwNeededRotation);
theCamera.setParameters(parameters);

Camera.Size afterSize = parameters.getPreviewSize();
if (afterSize != null && (bestPreviewSize.x != afterSize.width || bestPreviewSize.y != afterSize.height)) {
Log.w(TAG, "Camera said it supported preview size " + bestPreviewSize.x + 'x' + bestPreviewSize.y +
", but after setting it, preview size is " + afterSize.width + 'x' + afterSize.height);
bestPreviewSize.x = afterSize.width;
bestPreviewSize.y = afterSize.height;
}
}

这样就能够正确的显示相机拍摄的图片。

  1. 显示在手机屏幕上摆正只是相机显示,最终回调的图片数据还是横着的,所以还需要转换图像为竖屏的(这个数据量是比较大的),这个在竖屏中绝大都是进行数据转换(横屏图像数据转换成竖屏),代码如下:
1
2
3
4
5
6
7
8
9
10
11
12
13
14
15
16
17
18
19
20
21
22
23
24
25
26
27
28
29
30
31
32
33
34
/**
* Decode the data within the viewfinder rectangle, and time how long it took. For efficiency,
* reuse the same reader objects from one decode to the next.
*
* @param data The YUV preview frame.
* @param width The width of the preview frame.
* @param height The height of the preview frame.
*/
private void decode(byte[] data, int width, int height) {
long start = System.currentTimeMillis();
Result rawResult = null;
Handler handler = mIScanCallback.getScanHandler();
try {

if (null == mRotatedData) {
mRotatedData = new byte[width * height];
} else {
if (mRotatedData.length < width * height) {
mRotatedData = new byte[width * height];
}
}
Arrays.fill(mRotatedData, (byte) 0);
for (int y = 0; y < height; y++) {
for (int x = 0; x < width; x++) {
if (x + y * width >= data.length) {
break;
}
mRotatedData[x * height + height - y - 1] = data[x + y * width];
}
}
int tmp = width; // Here we are swapping, that's the difference to #11
width = height;
height = tmp;
}

byte[] data的数据长度在3110400,长度百万级别,那么将图片数据转换成竖屏需要大概在56ms (三星S6+)。

  1. 根据二维码框对应手机屏幕位置找到图片相对位置,通过以上步骤,我们将图片竖直了,接下来就是需要进行进行坐标映射,通过屏幕的扫描框映射到图片的具体框选坐标,然后裁剪数据:

相对坐标代码:

1
2
3
4
5
6
7
8
9
10
11
12
13
14
15
16
17
18
19
20
21
22
23
24
25
26
27
28
/**
* Like {@link #getFramingRect} but coordinates are in terms of the preview frame,
* not UI / screen.
*
* @return {@link Rect} expressing barcode scan area in terms of the preview size
*/
public synchronized Rect getFramingRectInPreview() {
if (framingRectInPreview == null) {
Rect framingRect = getFramingRect();
if (framingRect == null) {
return null;
}
Rect rect = new Rect(framingRect);
Point cameraResolution = configManager.getCameraResolution();
Point screenResolution = configManager.getScreenResolution();
if (cameraResolution == null || screenResolution == null) {
// Called early, before init even finished
return null;
}
rect.left = rect.left * cameraResolution.y / screenResolution.x;
rect.right = rect.right * cameraResolution.y / screenResolution.x;
rect.top = rect.top * cameraResolution.x / screenResolution.y;
rect.bottom = rect.bottom * cameraResolution.x / screenResolution.y;

framingRectInPreview = rect;
}
return framingRectInPreview;
}

上面的代码是计算图片二维码框的位置,然后进行裁剪。

针对上面步骤的优化

总结下面几点:

  1. 图片横着先不进行数据转换
  2. 将手机屏幕的扫码框先进行横着图片的坐标映射
  3. 主动裁剪出数据区域
  4. 将二维码区域数据裁剪

针对第一点,代码如下:

1
2
3
4
5
6
7
8
9
10
11
12
13
14
15
16
17
18
19
20
21
22
23
24
25
26
27
28
29
30
31
32
33
34
35
36
37
38
39
40
41
42
43
44
45
46
47
48
49
50
/**
* Decode the data within the viewfinder rectangle, and time how long it took. For efficiency,
* reuse the same reader objects from one decode to the next.
*
* @param data The YUV preview frame.
* @param width The width of the preview frame.
* @param height The height of the preview frame.
*/
private void decode(byte[] data, int width, int height) {
long start = System.currentTimeMillis();
Result rawResult = null;
Handler handler = mIScanCallback.getScanHandler();
try {
PlanarYUVLuminanceSource source = mIScanCallback.buildLuminanceSource(data, width, height);
if (source != null) {
BinaryBitmap bitmap = new BinaryBitmap(new GlobalHistogramBinarizer(source));//
try {
rawResult = multiFormatReader.decodeWithState(bitmap);
} catch (ReaderException re) {
// continue
} finally {
multiFormatReader.reset();
}
}

if (rawResult != null) {
// Don't log the barcode contents for security.
long end = System.currentTimeMillis();
Log.d(TAG, "Found barcode in " + (end - start) + " ms");
if (handler != null) {
Message message = Message.obtain(handler, DECODE_SUCCEEDED, rawResult);
//为了提高扫码速度,去除这里的生成bitmap的操作
// Bundle bundle = new Bundle();
// bundleThumbnail(source, bundle);
// message.setData(bundle);
message.sendToTarget();
}
} else {
if (handler != null) {
Message message = Message.obtain(handler, DECODE_FAILED);
message.sendToTarget();
}
}
} catch (ArrayIndexOutOfBoundsException e) {
if (handler != null) {
Message message = Message.obtain(handler, DECODE_FAILED);
message.sendToTarget();
}
}
}
  1. 映射横屏下的扫码框的坐标,代码如下:
1
2
3
4
5
6
7
8
9
10
11
12
13
14
15
16
17
18
19
20
21
22
23
24
25
26
27
28
29
30
31
32
33
34
35
36
37
38
39
40
41
42
43
44
45
/**
* Like {@link #getFramingRect} but coordinates are in terms of the preview frame,
* not UI / screen.
*
* @return {@link Rect} expressing barcode scan area in terms of the preview size
*/
public synchronized Rect getFramingRectInPreview() {
if (framingRectInPreview == null) {
Rect framingRect = getFramingRect();
if (framingRect == null) {
return null;
}
Rect rect = new Rect(framingRect);
Point cameraResolution = configManager.getCameraResolution();
Point screenResolution = configManager.getScreenResolution();
if (cameraResolution == null || screenResolution == null) {
// Called early, before init even finished
return null;
}

int left, top, right, bottom;

//坐标转换, 我们二维码扫描是竖屏,图像是横屏,所以需要计算二维码所处的相对坐标
left = rect.top * cameraResolution.x / screenResolution.y;
top = rect.left * cameraResolution.y / screenResolution.x;
right = left + rect.height() * cameraResolution.x / screenResolution.y;
bottom = top + rect.width() * cameraResolution.y / screenResolution.x;


//对应一些相机在竖屏下需要旋转270 才能够正常图像,但是图像是横屏的,这个图像也是调转的,所以也需要转换
if (getCWNeededRotation() == 270) {
int width = right - left;
left = cameraResolution.x - left - width;
right = left + width;
}

rect.left = left;
rect.top = top;
rect.right = right;
rect.bottom = bottom;

framingRectInPreview = rect;
}
return framingRectInPreview;
}
  1. 裁剪映射图片扫码框的数据区域,代码如下:
1
2
3
4
5
6
7
8
9
10
11
12
13
14
15
16
17
18
19
20
21
22
23
24
25
26
27
28
29
30
31
32
33
34
35
36
37
38
39
40
41
42
43
44
45
46
47
48
49
50
51
52
53
54
55
56
57
58
59
60
61
62
private byte[] mOriginData;
private byte[] mRotatedData;

/**
* A factory method to build the appropriate LuminanceSource object based on the format
* of the preview buffers, as described by Camera.Parameters.
*
* @param data A preview frame.
* @param width The width of the image.
* @param height The height of the image.
* @return A PlanarYUVLuminanceSource instance.
*/
public PlanarYUVLuminanceSource buildLuminanceSource(byte[] data, int width, int height) {
Rect rect = getFramingRectInPreview();
if (rect == null) {
return null;
}

int previewH = rect.height();
int previewW = rect.width();
int size = previewH * previewW;

if (null == mOriginData) {
mOriginData = new byte[size];
mRotatedData = new byte[size];
} else {
if (mOriginData.length < size) {
mOriginData = new byte[size];
mRotatedData = new byte[size];
}
}

int inputOffset = rect.top * width + rect.left;

// If the width matches the full width of the underlying data, perform a single copy.
if (width == previewW) {
System.arraycopy(data, inputOffset, mOriginData, 0, size);
}

// Otherwise copy one cropped row at a time.
for (int y = 0; y < previewH; y++) {
int outputOffset = y * previewW;
System.arraycopy(data, inputOffset, mOriginData, outputOffset, previewW);
inputOffset += width;
}

for (int y = 0; y < previewH; y++) {
for (int x = 0; x < previewW; x++) {
if (x + y * previewW >= mOriginData.length) {
break;
}
mRotatedData[x * previewH + previewH - y - 1] = mOriginData[x + y * previewW];
}
}
int tmp = previewW; // Here we are swapping, that's the difference to #11
previewW = previewH;
previewH = tmp;

// Go ahead and assume it's YUV rather than die.
return new PlanarYUVLuminanceSource(mRotatedData, previewW, previewH, 0, 0,
previewW, previewH, false);
}

这个步骤是,先裁剪出横屏的二维码区域数据,然后在旋转90度,数据交换的大小为419904,处理时间在6ms (三星S6+),这里扫码框是相对比较大的,是屏幕宽度的0.6,扫码框越小越快。

其他点的优化

二维码的对焦速度也影响扫码速度,生成bitmap也需要时间。针对这2点,我也做出了一些优化:

  1. 相比之前,官方是使用一个AsyncTask,然后使用线程Sleep的方式来控制对焦时间,AsyncTask本身是一个线程池,显然是比较浪费也不优雅的方式;修改方案是服用本身存在的CaptureHandler,在开始生成预览图(requestPreviewFrame(decodeThread.getHandler(), DECODE))之前发起对焦。
  2. 识别成功后,会生出一个bitmap,这个较耗大概18ms

针对上面2点,做出代码上的解释:

1
2
3
4
5
6
7
8
9
10
//对焦成功后的回调,和下次对焦的消息,这样完全不需要官方给出的AsyncTask,来对焦
public void onAutoFocus(boolean success, Camera camera) {
if (autoFocusHandler != null) {
Message message = autoFocusHandler.obtainMessage(autoFocusMessage, success);
autoFocusHandler.sendMessageDelayed(message, AUTOFOCUS_INTERVAL_MS);
autoFocusHandler = null;
} else {
Log.d(TAG, "Got auto-focus callback, but no handler for it");
}
}

不生成bitmap

1
2
3
4
5
6
7
8
9
10
11
12
13
14
15
16
17
18
19
if (rawResult != null) {
// Don't log the barcode contents for security.
long end = System.currentTimeMillis();
Log.d(TAG, "Found barcode in " + (end - start) + " ms");
if (handler != null) {
Message message = Message.obtain(handler, DECODE_SUCCEEDED, rawResult);
//为了提高扫码速度,去除这里的生成bitmap的操作
// Bundle bundle = new Bundle();
// bundleThumbnail(source, bundle);
// message.setData(bundle);
message.sendToTarget();
}
} else {
if (handler != null) {
Message message = Message.obtain(handler, DECODE_FAILED);
message.sendToTarget();
}
}
}

以上就是现阶段的优化,当然还有存在的继续优化的空间。

Android的内存优化是性能优化中很重要的一部分,而避免OOM又是内存优化中比较核心的一点,这是一篇关于内存优化中如何避免OOM的总结性概要文章,内容大多都是和OOM有关的实践总结概要。理解错误或是偏差的地方,还请多包涵指正,谢谢!

###(一) Android的内存管理机制

Google在Android的官网上有这样一篇文章,初步介绍了Android是如何管理应用的进程与内存分配:http://developer.android.com/training/articles/memory.html Android系统的Dalvik虚拟机扮演了常规的内存垃圾自动回收的角色,Android系统没有为内存提供交换区,它使用paging与memory-mapping(mmapping)的机制来管理内存,下面简要概述一些Android系统中重要的内存管理基础概念。

####1)共享内存

Android系统通过下面几种方式来实现共享内存:

  • Android应用的进程都是从一个叫做Zygote的进程fork出来的。Zygote进程在系统启动并且载入通用的framework的代码与资源之后开始启动。为了启动一个新的程序进程,系统会fork Zygote进程生成一个新的进程,然后在新的进程中加载并运行应用程序的代码。这使得大多数的RAM pages被用来分配给framework的代码,同时使得RAM资源能够在应用的所有进程之间进行共享。
    大多数static的数据被mmapped到一个进程中。这不仅仅使得同样的数据能够在进程间进行共享,而且使得它能够在需要的时候被paged out。常见的static数据包括Dalvik Code,app resources,so文件等。
    大多数情况下,Android通过显式的分配共享内存区域(例如ashmem或者gralloc)来实现动态RAM区域能够在不同进程之间进行共享的机制。例如,Window Surface在App与Screen Compositor之间使用共享的内存,Cursor Buffers在Content Provider与Clients之间共享内存。

在Android调试的时候我们经常会遇到no debuggable application,这里说下我自己的解决办法,以便以后查找。

通过AndroidStudio中 Tools->Android->Enable ADB Integration active. 之后需等待一会,可能adb会重启,之后就会发现那个框框正常显示你已启动的app

这个时候可能还会遇到依然是no debuggable application,我的解决办法是找到下拉通知栏中的正在通过USB,如图:

进入到选择对话框,选择一个试试。

最近一直在着手处理文件下载相关的东西,介于没有足够的精力重头开始写,github发现一个文件下载库,其设计还是非常不错的,这里就简要的分析下其结构构成。非常感谢这位小伙伴的开源精神,作者的Jacksgong github,博客Jacksgong blog

框架的模块构成

一个下载框架主要需要包含以下几个模块:

  1. 网络请求和文件流模块
  2. 消息回调机制
  3. 跨进程间通信模块
  4. 信息存储模块
  5. 异常处理模块

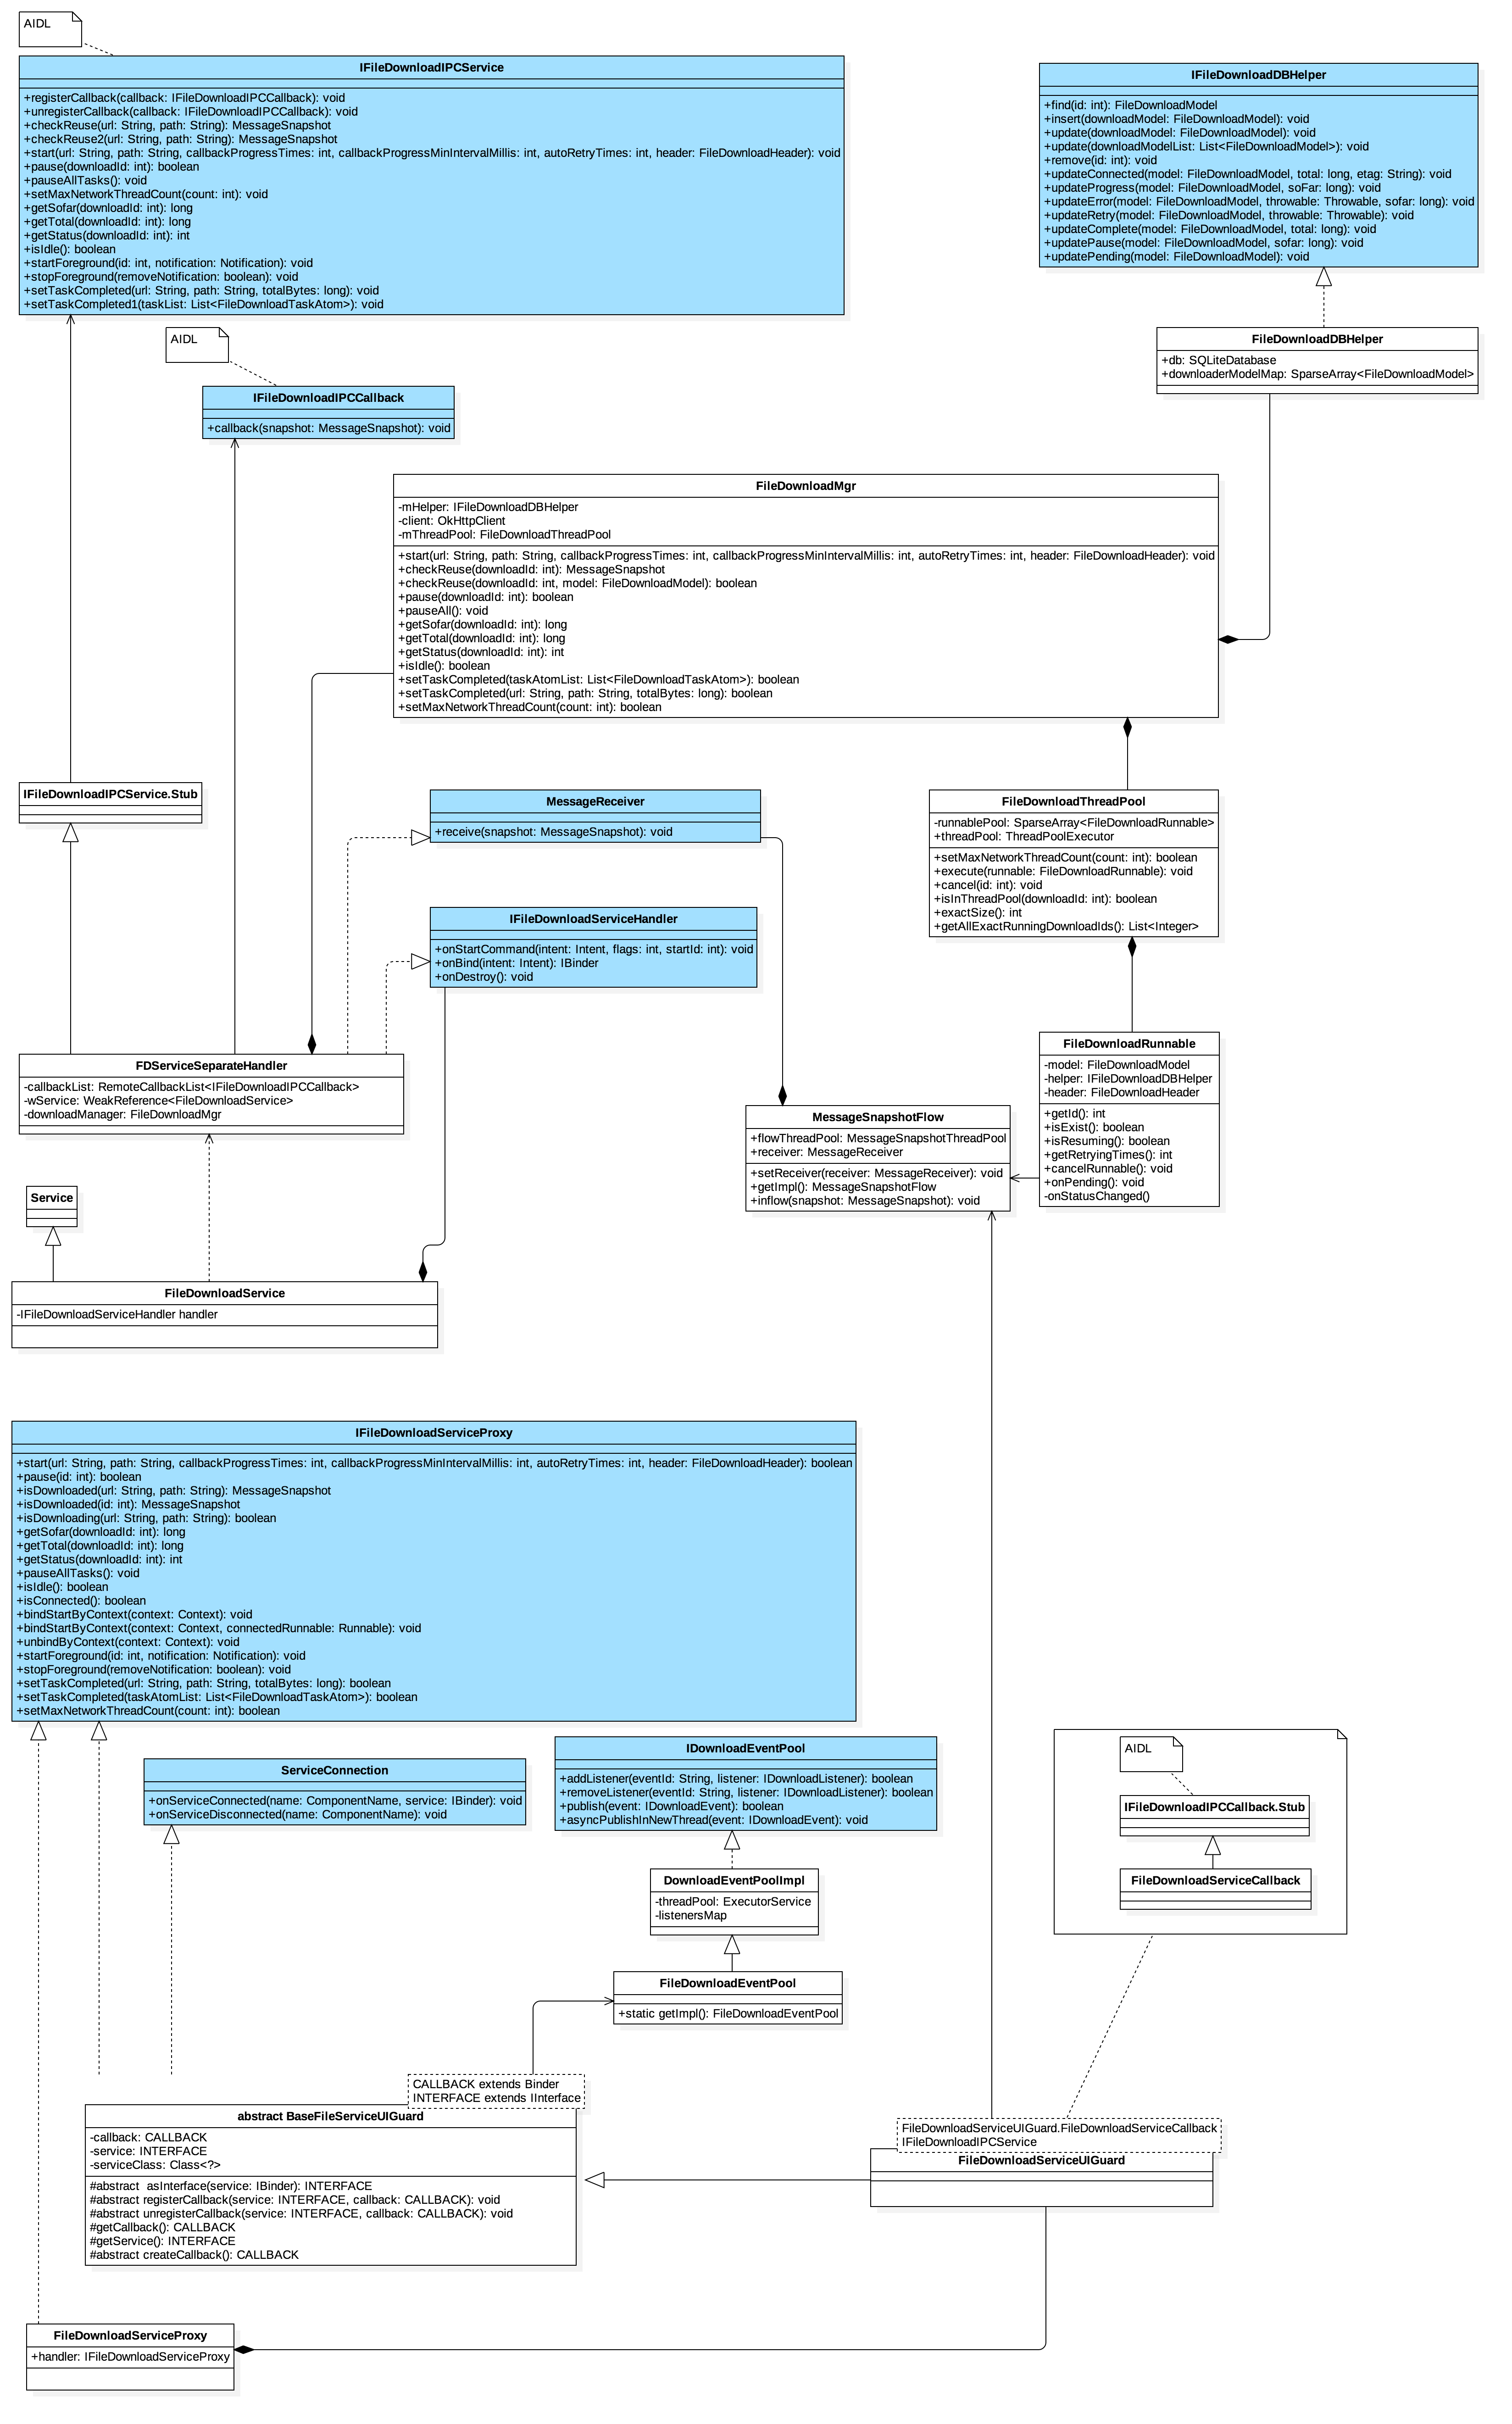
以下是我对下载框架的一个类图结构分析,这部分主要涉及的是独立进程中文件下载需要处理的任务 和 提供远程接口端的类图,暂时没有涉及上层逻辑结构。

首先跨进程间的通信方式是采用:

  1. 通过Binder来实现远程调用(IPC):这种方式是Android的最大特色之一,让你调用远程Service的接口,就像调用本地对象一样,实现非常灵活,写起来也相对复杂。
  2. 在FileDownloadService里面handler(IFileDownloadServiceHandler)持有实现一个IFileDownloadIPCService.Stub接口的Binder,并且在onBind()中返回此Binder对象
  3. 同时在实现IFileDownloadServiceHandler接口的FDServiceSeparateHandler类中拥有了文件下载的远程消息的回调,同时在这个handler中封装了对文件下载管理操作类FileDownloadMgr,远程接口IFileDownloadIPCService中的实现都交由FileDownloadMgr来实现和管理,Service所有操作都委托交由FDServiceSeparateHandler来处理,FDServiceSeparateHandler也实现了MessageReceiver来处理进程间的消息回调,其真正处理回调处理是由IFileDownloadIPCCallback远程接口来实现。
  4. 文件的下载中拥有文件下载的线程池FileDownloadThreadPool,线程池中的单个子单元是由一个Runnable构成,在FileDownloadRunnable中有下载文件的相关信息以及相关的操作,在这里我们可以看出,在执行Runnable的线程中是单个的,Runnable中涉及网络请求和数据流的传输都在Runnable中完成,文件的读写操作是堵塞的,Runnable中的文件下载的相关状态信息是通过MessageSnapshotFlow.getImpl().inflow(MessageSnapshotTaker.take(status, model, this))发出的,消息发出交由FDServiceSeparateHandler的receive(MessageSnapshot snapShot),随之RemoteCallbackList callbackList将发起进程间回调通信,来完成通知下载状态的更新,通过以上的步骤来完成Service与其他进程的通信。
  5. 文件的下载状态都会记录到指定的数据库中,以便支持完善的下载进度和断点续传功能。

Service代理以及和Service所在进程的通信:

  1. FileDownloadServiceProxy实现了IFileDownloadServiceProxy接口,其接口真正的实现是由FileDownloadServiceUIGuard来处理,在FileDownloadServiceUIGuard中提供了进程间通信需要的CALLBACK和INTERFACE
  2. BaseFileServiceUIGuard抽象类中实现了ServiceConnection,在onServiceConnected中完成registerCallback,将registerCallback实现交给子类FileDownloadServiceUIGuard,在onServiceConnected中返回了IBinder
  3. 通过IFileDownloadIPCService.Stub.asInterface取得远程接口对象,之后通过这个获取的远程接口实现注册相关的操作,同时通过这个远程的接口实现进程间的通信。
  4. 在FileDownloadServiceUIGuard中提供了远程接口注册时需要的IFileDownloadIPCService.Stub接口的Binder。
  5. FileDownloadServiceUIGuard继承了BaseFileServiceUIGuard,所以FileDownloadServiceUIGuard必须实现FileDownloadServiceProxy接口。同时在BaseFileServiceUIGuard中已经拥有IFileDownloadIPCService的远程接口,
    所以FileDownloadServiceProxy接口实现是通过获得的远程接口去实现的,同时这个就是我们说的跨进程通信的方式。
  6. 那么现在还有一个比较重要的点,现在怎样把文件下载进度信息交给其他进程呢?不难发现我们注册了一个CallBack的Binder。client端与server不在一个进程,server是无法得知client解注册时传入的回调接口是哪一个(client调用解注册时,是通过binder传输到server端,所以解注册时的回调接口是新创建的,而不是注册时的回调接口)。为了解决这个问题,android提供了RemoteCallbackList这个类来专门管理remote回调的注册与解注册。
  7. 通过上述分析,client和Service通信以及Service和client的通信,client和Service通信通过onServiceConnected中返回的IBinder,进而取得远程接口,实现client和Service通信。Service和client通信通过RemoteCallbackList,通过client获取的远程接口,同时通过这个远程接口回调注册,实现Service与client的通信。
  8. 经过上述的分析,我们已经能够知道所有的连接通信逻辑都已经由FileDownloadServiceProxy委托代理。

上层逻辑类图结构逻辑分析

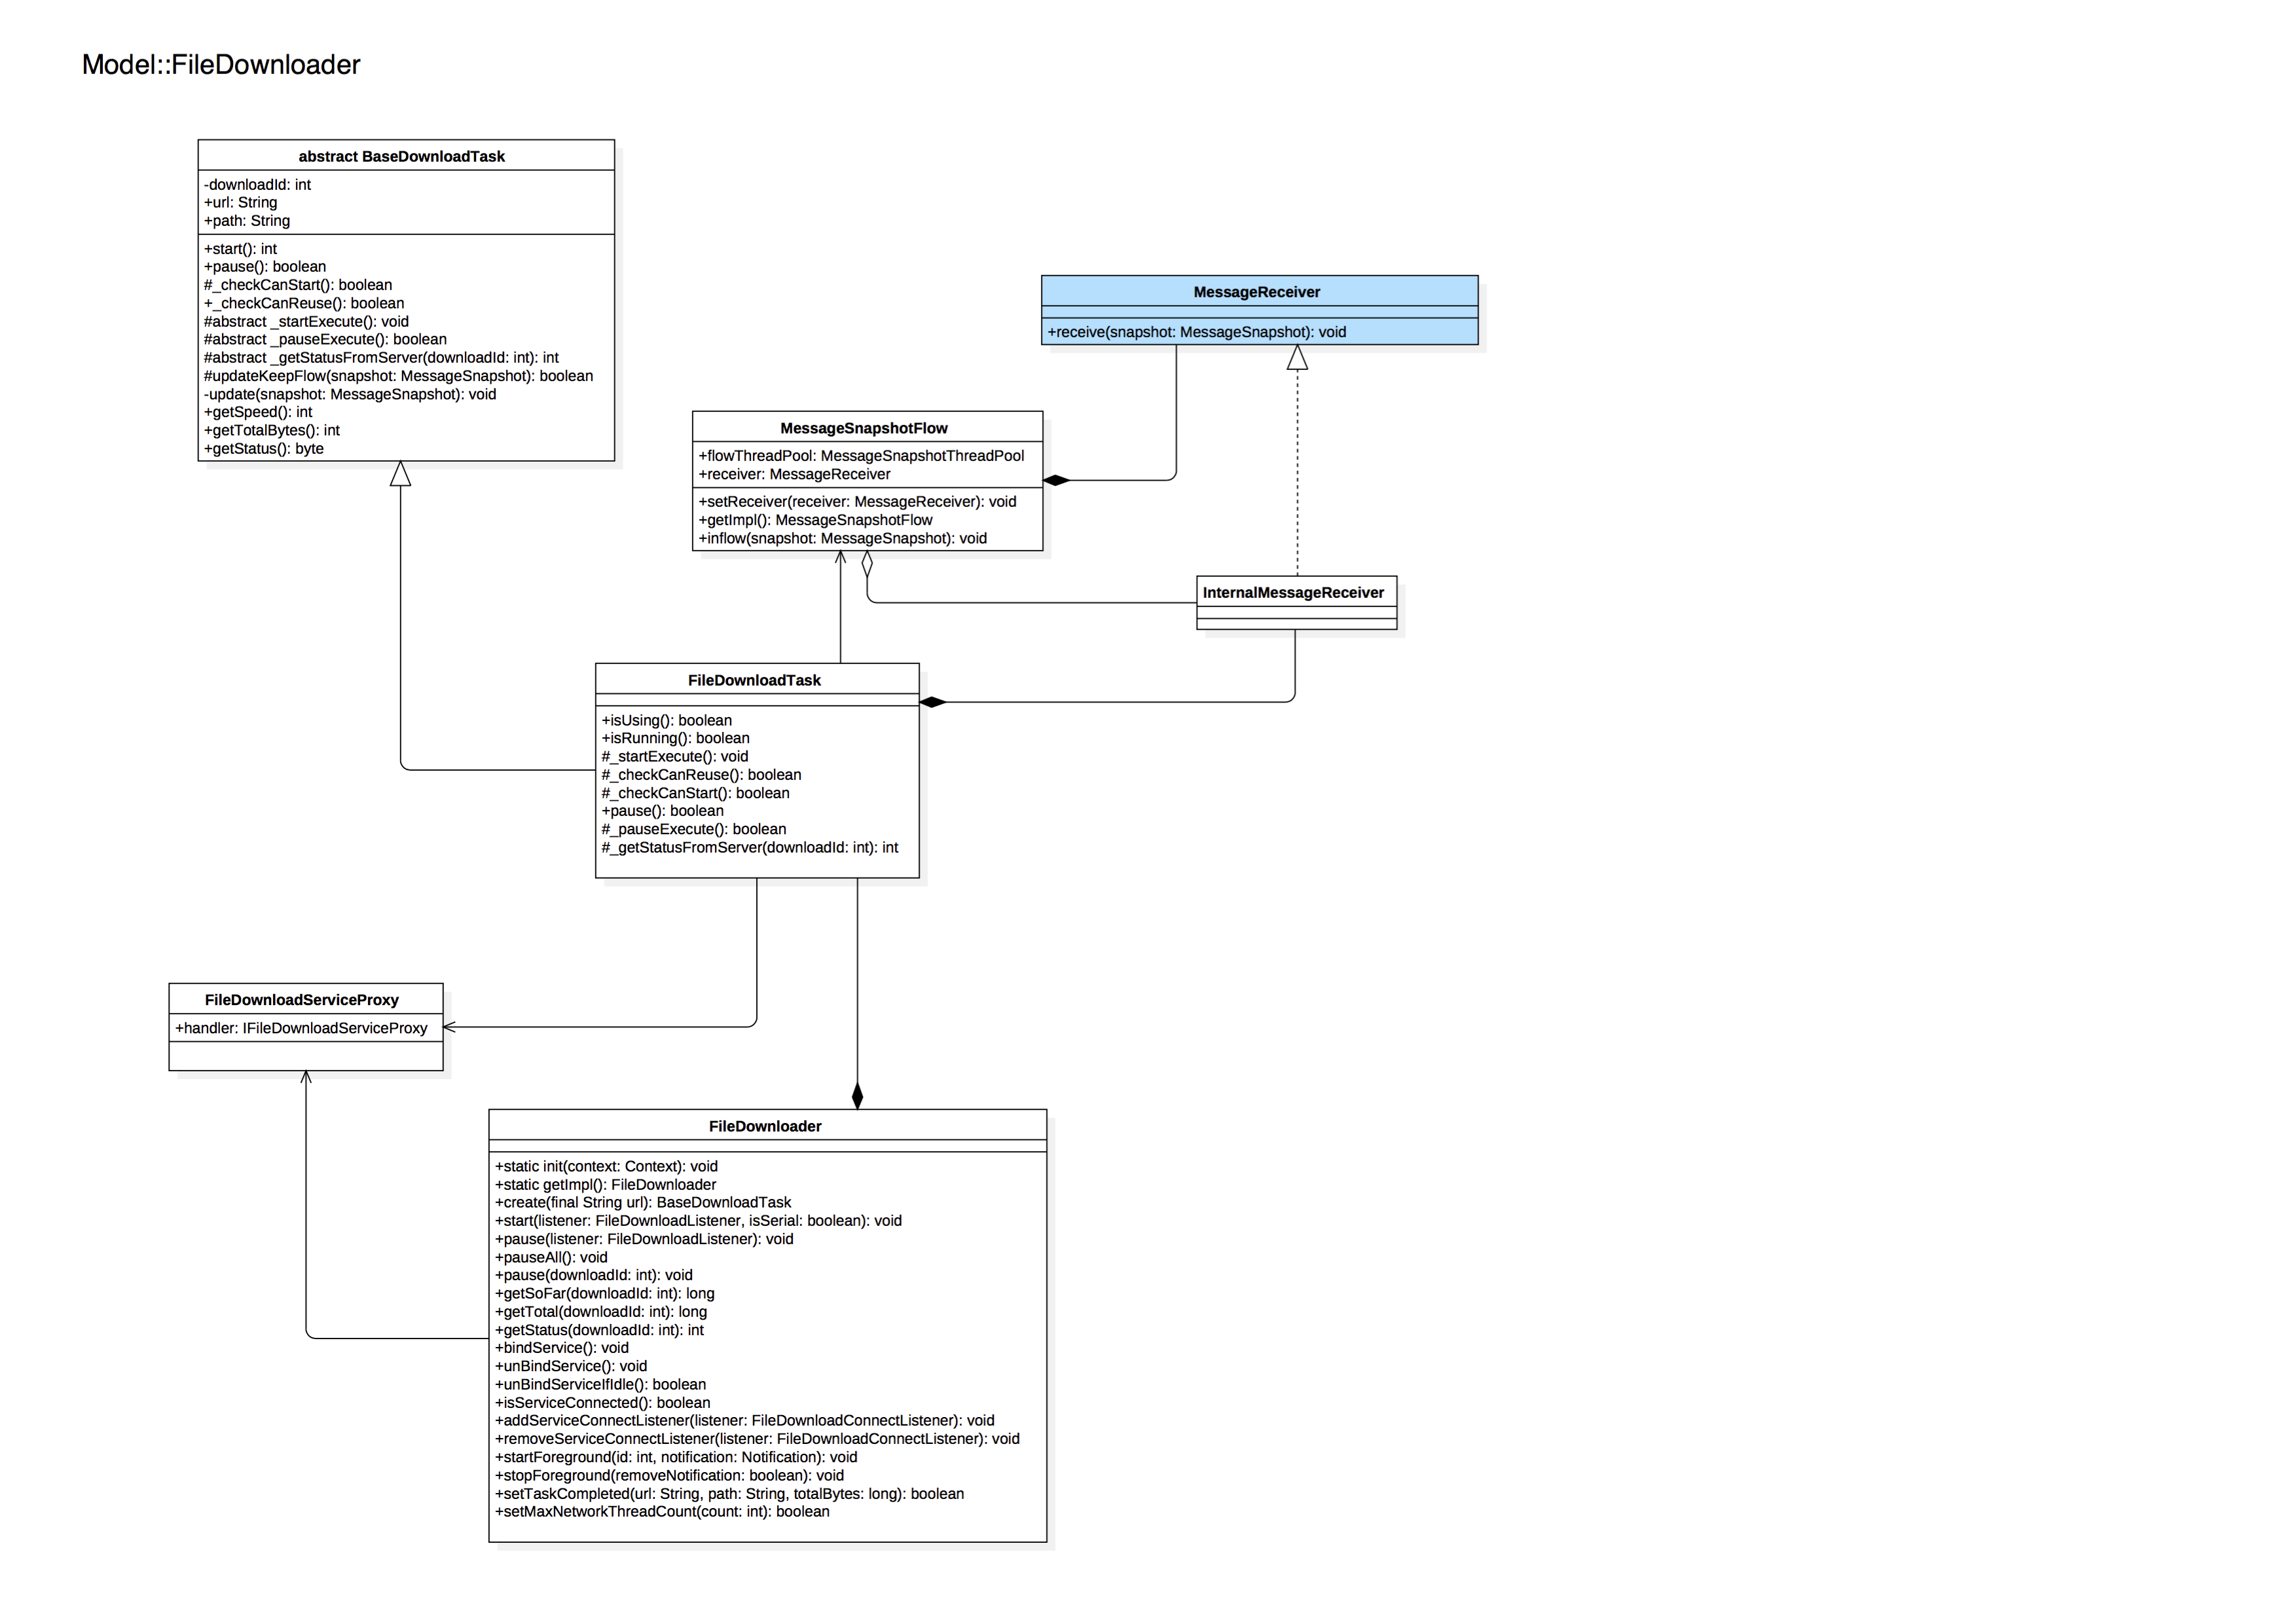
上层的结构逻辑主要是对远程结构代理的封装,由外部组装必要的数据以及外部等待下载状态的更新。类图结构如下:

client的结构构成:

  1. 每一个下载任务对应一个单独的FileDownloadTask,其和Service的跨进程通信通过FileDownloadServiceProxy进行关联
  2. Service和client的下载状态的回调是通过MessageReceiver接口来实现的,其正确的流程是Service进程中的Runnable下载文件状态 -> MessageSnapshotFlow.getImpl().inflow()(Service进程) -> FDServiceSeparateHandler(实现了MessageReceiver接口) -> FDServiceSeparateHandler的receive()调用RemoteCallbackList callbackList来完成Service和client的通信。
  3. FileDownloader是统一收敛、数据组装、状态查询的直接外部入口类,其内部核心处理还是通过FileDownloadTask来构建任务、FileDownloadServiceProxy来处理跨进程数据通信。

通过以上的分析介绍,我们能够知道,其下载其实主要就是通信模块的构建,也就是我们常说的外壳,外壳保证了通信逻辑,我们先构建出来通信外壳模块,将网络连接和文件下载抽象独立出来。外壳保证通信的准确性,下载内核保证了数据的准确性。
同时通过对以上框架的分析,我们需要做到将下载核抽象出来,这样能够更灵活的配置下载核,同时也给下载核更多的发挥空间。

简单的创建demo任务:

1
2
3
4
final BaseDownloadTask task = FileDownloader.getImpl().create(url)
.setPath(path)
.setCallbackProgressTimes(100)
.setListener(taskDownloadListener);

这样就完成了一个任务下载,任务的状态信息回调在监听中处理就OK了。

自从自己开始体系的完成一个产品需求的时候,从中学到了很多,也发现了很多自己不足的地方。自己的本意本来是想把事情做的更好,所以需要不断的发现自己在哪点上做的不够好。

以前做事,之前是在一家公司,因为自己要独立完成整个App包括测试。所以在大部分时间都是在写代码,进行功能测试。那种感觉真的很好,对待一个产品就像对待自己的小孩一样,你就会想要把她完成的更好。同时大家也会交流,虽然很累但是很满足。

自从来到UC,我慢慢的接触了大产品的开发流程,但是我习惯了之前天马行空的工作方式,所以我一直在思考如何把事情做的更好。

最近完成一个需求,我尽量按照自己规定的路子走,很理想的把功能模块完善的很好。整理了完善的文档,我就想将需求的实现的思路纪录下来,方便后来人更快的熟悉功能模块的开发思路。

渐渐的我学会了稳重的处理手上的需求,急躁和慌张不能给你带来任何的积极的效果,自己需要做的就是安心的做好手头上的事情。

我觉得人应该学会感恩,尤其是那些愿意说你的人。

  • 在这里我特别感谢组里的丹琦妹子,虽然说你每次都给我找茬。但是每次的说我做的不好的地方我都默默的会记在心里,我下次肯定努力克服。
  • 也要感谢我组内的强哥,强哥每次都会和我很细致的讨论一个问题。甚至帮我理清思路,虽然我的代码写的不是那么优雅,但我一直在路上啊^_^

我们成长路上会遇到很多人,也会遇到很多事。不要抱怨、不要排斥,我们应该心存一颗感恩的心,即使别人骂你、别人说你。别人说你、骂你说明别人希望你更好,那么我们为啥不说声感谢呢!然后收拾心情好好整理自己,重新改善自己。

我觉得只要自己在进步、在改进,即使事情做的不是那么如意,我们也要为自己的上进而鼓掌。

当感恩成为习惯

欢乐似水流远

日子尽管过得平凡

充实之感实在,

当感恩成为习惯

生活不愿慢怠

修我行为

炼我意识

和谐永远培栽